Viewing entries in
party animals

Comment

Tortilla-Wrapped Poblanos Stuffed with Corn and Almond Pâté

Hey, welcome. Consider following MSV on Twitter and subscribing to the RSS feed, or sign up for email updates right over here.

AKA the lazy vegan's chiles rellenos. Like any stuffed dish, these poblanos—filled with a delightfully rich and comforting mix of creamy almond pâté and sweet corn kernels—take a bit of effort to prep, but they're totally do-able, even on a weeknight. Also, best entertaining dish ever—serve with a little beans and rice and Palomas, with a mezcal digestif, and done. The peppers take a bit of time to cook in the oven, so if you really want to revel in your dinner, you have plenty of time to make a batch of fresh tortillas while that goes on. If you just can't find the energy, store-bought guys will do the trick on any given Tuesday.

I will note that there's a little messing with stuff in a hot skillet in order to get that tortilla glued around the roasted pepper, so if you're a brand-new cook, or tend to be extra timid with such things, you may want to wait until you have a day off and/or a kitchen buddy on hand. But it's well worth the effort, and way easier than frying battered peppers, so I encourage you not to let that deter you from trying these out.

To give credit where it's due, I've long had the notion of stuffed poblano tamales in my head, but I've been out of the tamal groove (tragedy!), and so they remained only a tasty dream. Then at La Cocina de Frida in a Oaxaca market, something was brought to the table.

See that little guy all wrapped up in the lower right corner? Genius. And so simple. I didn't taste that dish, since the poblano there was stuffed with cow's milk cheese, but I thought, why not? Why not, indeed?

When you shop for peppers, be sure to grab ones that will fit comfortably in your tortillas. I generally believe thick tortillas to be the absolute end, but in this case, a more standard thickness (or, if you're making your own, even a little thinner than store-bought) is the perfect amount of carbs to go along with your little green dreamboat. So for maximum deliciousness, you'll want a single tortilla to wrap around the pepper and seal in front (unlike that picture up top where there's an extra tortilla glued in at the bottom because that pepper was too large—whoops).

Look at that guy. So good. First one to try it on an outdoor grill instead of a skillet wins summer.

Tortilla-Wrapped Poblanos Stuffed with Corn and Almond Pâté

Print the recipe

serves 4

4 small-medium poblano peppers, washed and dried

100 grams blanched almond meal

3 TBSP lime juice

1/3 cup unsweetened soy milk

2 TBSP canola (or other neutral vegetable) oil

1 scallion, trimmed and thinly sliced

1/2 tsp salt

1/2 tsp dried Mexican oregano

2/3 cup frozen (or fresh) sweet corn kernels

olive oil, for drizzling

4 corn tortillas, freshly made or store-bought

1 tsp all-purpose flour

1 tsp water

Begin by preparing the peppers. Slice the pepper lengthwise down the center, stopping before you get to the tip. Make two more cuts at the top, cross-wise, to give yourself some room to work, but leave the back half of the pepper top attached. Use a paring knife to cut away the seeds and veins, as best you can. Repeat with remaining peppers and set aside.

Heat oven to 400. Have an 8x8" square (or similarly-sized) nonstick dish ready.

Add almond meal, lime juice, milk, oil, scallion, salt, and oregano to a food processor and process until smooth. Remove blade and stir in corn. Spoon mixture into peppers. Do not overstuff, since the almond mixture will puff a bit during cooking.

Transfer filled peppers to baking dish and drizzle lightly and evenly with olive oil. Bake 45 minutes, until filling is cooked (it will be creamy, but not wet) and peppers are roasted and well browned in spots. Set aside.

When ready to serve, heat a nonstick skillet over medium heat. While it heats, stir together flour and water in a small bowl to form a paste.

Add a tortilla to the skillet to warm it until pliable, just about half a minute. Carefully place a pepper atop it, cut-side up. Use tongs to pull one side of the tortilla up over the pepper and hold it in place with your hand. Use a finger to spread a dollop of flour paste on the top of the tortilla edge, then pull the other side of the tortilla up (using the tongs again) and press gently to glue it in place. With still holding the tortilla edges to keep them together, carefully turn the whole thing over so that the folded side is now at the bottom of the skillet and press very gently to ensure both ends are secured by the weight of the pepper. (This sounds far more complicated than it is—do it once and you'll have it down). The heat will take care of the rest and seal your tortilla once the paste is cooked. Let cook a couple of minutes, until golden, then carefully flip and brown the other side. Carefully transfer to a serving dish with a wide spatula. Repeat with remaining peppers and serve.

Comment

Comment

Party Animals No. 58: Rosette Veg Tart for a Potluck with the Neighbors

Hey, welcome. Consider following MSV on Twitter and subscribing to the RSS feed, or sign up for email updates right over here.

Happy Friday, everyone. I have an imprecise Party Animals post today, featuring this deep-summer veg tart, which I made mid-spring. I can't begin to know whom to credit for the veggie-rosette thing, but once I saw pictures, I knew exactly what to take to my neighbors' potluck (where people would be eating my cooking for the very first time). It was a lovely evening, and I'm pretty pleased with how this guy came out. Especially since I didn't follow anyone's recipe, and just winged it. (No, I have no idea why. I blame a busy schedule?) It's rich, but also decidedly vegetal, thanks to sheer quantity of veg needed to make the rosette. And of course, texture abounds: tender, thin squash and eggplant, flaky pastry, and rich almond pâté all play extremely well together.

To make something similar at home, grab a half-dozen yellow and green squashes, a globe eggplant, and your very finest vegetable peeler. Wash them all well and set them aside. Now prepare a batch of Lemon and Herbes de Provence Almond Pâté, and get it in the oven. While it bakes, if you have time and desire, whip up a pie crust. If you're in a hurry, set out some vegan puff pastry to thaw, as I did.

While that bakes and the other thaws, get to spendin' some quality time with the veg. Slice, slice, slice, until you have a massive stack of thin planks. Here's where my instructions get murky. To season the veg, I tossed it in a simple lemon vinaigrette, but my tongs tore up some of the more delicate squash planks (where it gets seedy). So, I dunno. Maybe very gently mix with your hands. Maybe mix the vinaigrette separately and drizzle it very slowly over the assembled tart. Who could know? There might be a recipe out there that could help, but I wouldn't know. I'm too busy to do things like learn, apparently.

Stuff your thawed pastry sheet into a nonstick 9-inch springform pan, and stretch the high corners over to help the bits that fall short. Don't sweat it too hard. Spread the still-warm pâté over the pastry using the back of a spoon (wet it to prevent sticking). Wrap your veggies around each other until all you have left is broken planks, and you're too tired of all this endless wrapping to try to piece together the rest of the rosette. Save the broken bits for grilled veggie sandwiches. Fold in the rest of the puff pastry so you have kind of a galette-thingy with a crust of puff pastry filled with almond pâté, which will be bananas-tasty.

Season your tart with flaked sea salt and black pepper. Pop it in the oven until golden, let cool before removing the pan sides and wrapping in parchment. The next day, when you actually attend your potluck, pop the tart (still on the bottom of the springform pan) back into your oven on a warm setting while you make mashed potatoes to go along with your tart, and leave it in the oven until time to head next door. Accept all the compliments on how pretty your tart is (even though you technically messed it up) and be ready to explain what all that is, exactly. Drink your neighbors' wine, and have a nice time. The tart is best served warm.

Happy gathering.

Comment

Comment

On the Town No. 4: Greetings from Oaxaca

Heya! I don’t have a recipe for you this week because I’ve been in Oaxaca soaking up all the textiles, mezcal, chocolate de agua, paint, plants, and politics I can manage in only a handful of days. Folks who have been reading for a while know that Mexican food traditions are my absolute favorite to draw from when putting together my own meals, so this first trip to the nation is a long time coming for me.

I won’t do a long Oaxaca post (I mean, unless y’all really ask for it), but please know I’m sending this digital postcard(*) with much love and masa. Back to normal scheduling this week, all going well.

(*so to speak—I’m actually just back home now, sigh)

Comment

Comment

Blackberry and Rose Water White Wine-Lillet Blanc Sangria

Hey, welcome. Consider following MSV on Twitter and subscribing to the RSS feed, or sign up for email updates right over here.

Your next spring afternoon pitcher has arrived.

This white sangria—sweetened with a syrup flavored with blackberries and rose water—is an easy-going affair. Choose a dry white, maybe something grassy (such as a New Zealand Sauvignon Blanc). You'll add Lillet Blanc (a French fortified wine) to add depth of flavor. I'm currently in love with Lillet-spiked white sangrias. They have more depth than a wine-only recipe, but aren't as stiff as one with liqueur added. Add frozen raspberries and a couple of ice cubes, and get ready to sip away in the sun.

Blackberry and Rose Water White-Lillet Blanc Sangria

Print the recipe

serves 6

750 ml dry white wine, chilled

1 cup Lillet Blanc, chilled

1/4 cup Blackberry-Rose Syrup, recipe follows

1 sweet apple, diced

frozen blackberries (not thawed), to serve

rosemary sprigs, to garnish

Combine wines, syrup, and diced apple in a serving pitcher. Stir to combine. To serve, add two ice cubes and a handful of frozen blackberries to a wine glass. Pour in sangria and garnish with a sprig of rosemary.

Blackberry-Rose Syrup

1/2 cup sugar

1/2 cup water

1/2 cup frozen (or fresh) blackberries

1/8 tsp rose water

Dissolve sugar into water, stirring occasionally, in a small pot over high heat. Bring to a boil and immediately add berries. Bring back to a boil, cover, and reduce heat to low. Cook at a low simmer for 30 minutes. Strain, reserving stewed berries for another purpose. Stir in rose water and let cool before using. Store leftover syrup in the refrigerator.

Comment

Comment

Party Animals No. 57: A Table of Munchies for Xmas Eve (or Whenever You Need)

Hey, welcome. Consider following MSV on Twitter and subscribing to the RSS feed, or sign up for email updates right over here.

I host both Thanksgiving and Christmas Eve at my place for our tiny family. After the big November meal, my husband requested more of a cocktail-party setup for December. We still served ourselves buffet-style for ease. If you need a festive spread for NYE or any other time, may this generous little spread help you with inspiration.

Beverages:

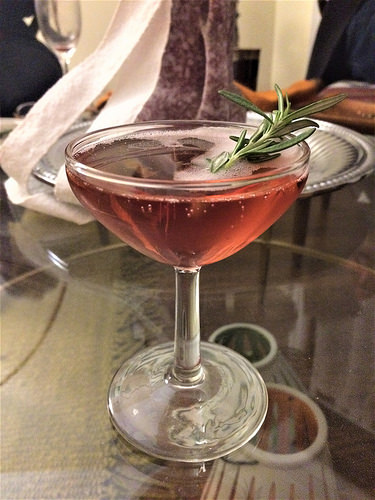
  • Kir Royale
  • spiced Assam tea Toddy (substituting grade A dark/robust maple syrup for honey)
  • for non-alcoholic, spiced tea with hot soy milk and a little extra maple

The munchies menu:

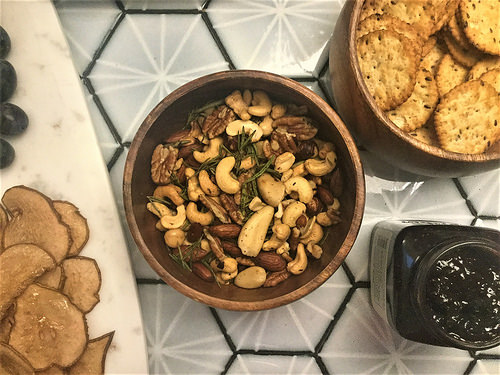
  • fresh grapes
  • pear chips (pear slices pressed in sugar and baked at low temp for a couple hours)
  • rosemary mixed nuts
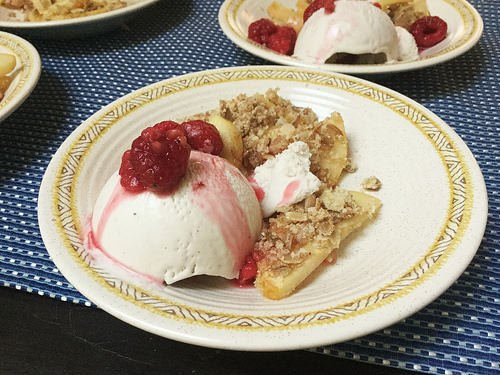
  • spiced oat cookies with espresso glaze
  • toasted french bread slices and whole-grain crackers
  • smoky almond pâté
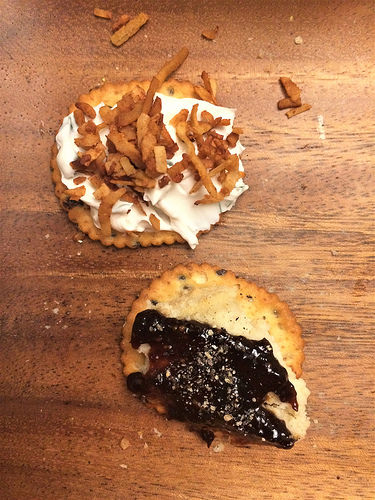
  • veg cream cheese (Kite Hill recommended) with dill and capers
  • ginger fig jam (store bought)
  • freshly cracked black pepper
  • coconut bacon

Happy entertaining! Here's to the days getting longer and the table being full. Happy New Year's to you all, and thanks so much for hanging with me in this totally bananas year. Onward!

Comment

Comment

Party Animals No. 56: Thanksgiving 2017

Just a quick pop-in to run over the all-vegan MSV Thanksgiving for the year.

Which was pretty much exactly the same as last year. The family has decided this menu is not broken and should therefore not be fixed. There was a little freedom to play with the welcome cocktail and dessert, though, so here we go.

Raspberry lambic and creme de cassis topped with brut cava and garnished with a rosemary sprig-skewered branded raspberry made for a fruity and lively drink to toast the day.

Dessert was a dead simple apple crisp (based on this recipe), served warm with (Coconut Bliss brand) vanilla ice cream and topped with those brandied cranberries.

Hope everyone who got a long weekend enjoyed it. As ever, thanks so much for being here.

Comment

Comment

The Basics No. 5: The MSV Waffle

Hey, welcome. Consider following MSV on Twitter and subscribing to the RSS feed, or sign up for email updates right over here.

For a basic recipe, this isn't a standard waffle. But it's my standard waffle, the recipe I make when I make waffles. These guys start with all-purpose flour, but get an assist from cornmeal, which adds extra flavor, color, and a mildly rustic texture. And this recipe isn't a quick batter: these waffles get their loft—not to mention even more flavor—from active dry yeast.

They're still dead simple to throw together, thanks to the fact that the yeast batter sits overnight to develop. Which also means you're measuring your flour out the night before instead of first thing in the morning, which I consider a bonus, too.

Finally, there's the faintest hint of warmth from the addition of ancho liqueur, and it's matched by an equal amount of orange liqueur. The effect is seriously subtle (you might never have noticed it if you didn't know it was in there).

All of these tweaks are gentle—the cornmeal, the yeast, and the liqueur. So when you get ready to drizzle on the maple syrup and tuck into these waffles, you still feel like you're sitting down to a pretty classic breakfast dish. Just with more notes than toasted wheat and syrup. If you have a mild sweet tooth, especially when it comes to breakfast, then you may make this your go-to waffle, too. If not, give it a shot when you find yourself in need of a twist.

The MSV Waffle

Print the recipe

yields 12 waffles, adapted from Mollie Katzen's Sunlight Cafe

1 1/2 cups all-purpose flour

1/2 cup cornmeal

1 TBSP natural cane sugar (evaporated cane juice)

1 tsp active dry yeast

1/2 tsp fine sea or kosher salt

2 cups unsweetened soy milk

6 TBSP canola oil

2 TBSP Ancho Reyes ancho chile liqueur

2 TBSP orange liqueur, preferably Grand Marnier rouge

In a mixing bowl, whisk together flour, cornmeal, sugar, yeast, and salt. Whisk in milk. Cover with plastic wrap and transfer to refrigerator. Let sit overnight.

In the morning, heat your waffle iron. (If your waffle iron does not have a nonstick surface, grease the iron before adding batter.) When ready, beat canola oil and liqueurs into batter. Add one-quarter cup batter to each square of the iron and cook according to the manufacturer's directions, until crisp and deeply golden on the outside. Serve at once. (If you need to wait and serve the waffles all at once, hold finished waffles in a warm oven to keep them crisp while you cook the rest.)

Comment

Comment

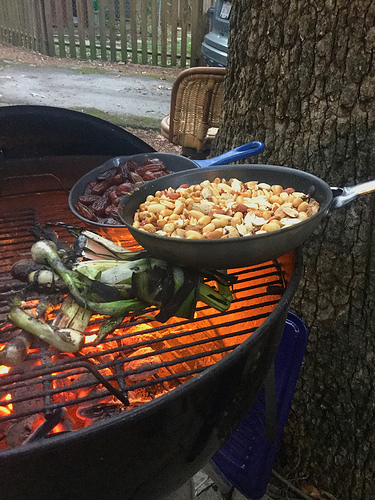
Party Animals No. 55; On the Town No. 3: A (Calcotada-Inspired) Backyard Barbecue

Another hasty photo essay:

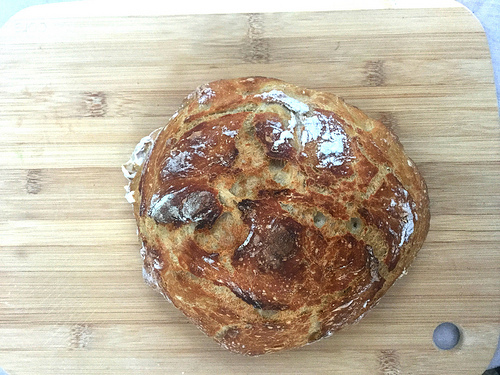
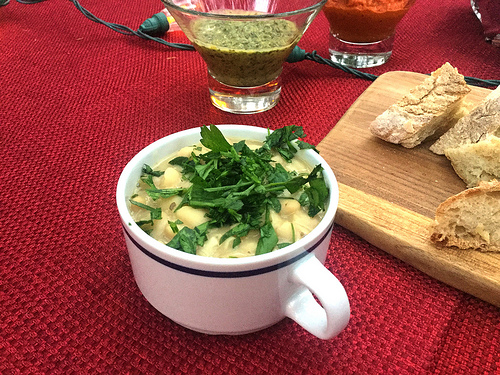
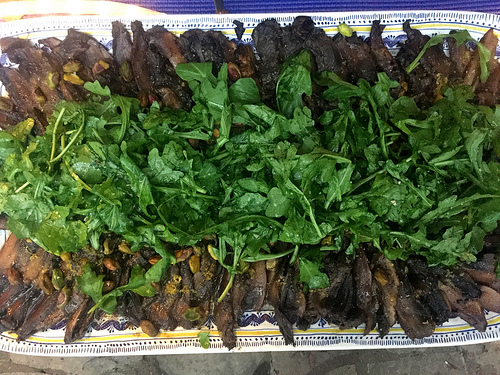
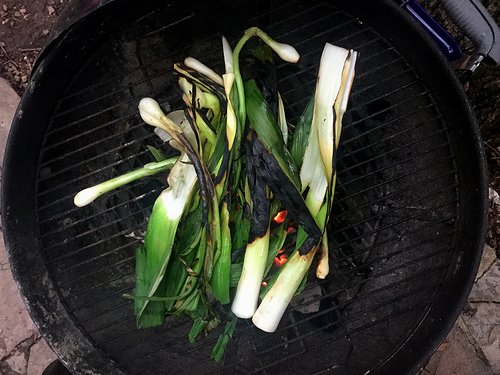
My pal Elaine hosted a great-big onion-grilling party (inspired by the Catalan calcotada tradition). For you fellow East Tennesseeans, consider this a suggestion for celebrating ramp season come March. I co-hosted the cookout, insofar as I helped make some stuff and invited some friends. My contributions:

1. Bread! Crusty, beautiful boules from the famously tried-and-true Sullivan Street Bakery recipe.

2. White wine-braised white beans and garlic, served in adorable mugs along with that bread.

3. Miso-marinated, thinly sliced portobello mushrooms topped with lemon zest, pistachios, and arugula—highly recommended.

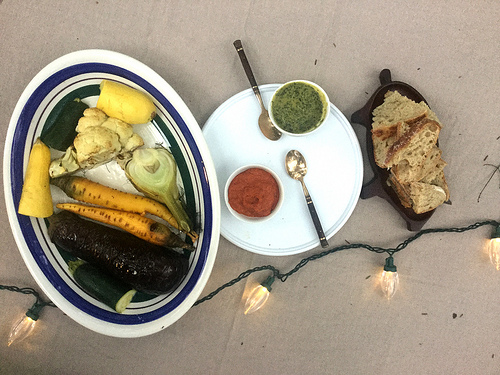
4. Vegetables roasted whole, served alongside the grilled onions with a romesco-type sauce and Elaine's beautiful mixed-herb sauce.

After munching on the veggie courses out of doors, we were driven inside by light sleet and the disappearance of the last ray of sun. And thus officially began the indoor-party season. Happy November, and I'll be back soon with a new recipe.

Comment

Comment

Party Animals No. 53: Fig Paste, Fig Syrup, and Instant Pantry Entertaining

Hey, welcome. Consider following MSV on Twitter and subscribing to the RSS feed, or sign up for email updates right over here.

We have some catching up to do, don't we? Let's get to it.

I missed two weeks in a row, which is a first on MSV. It's a bummer but couldn't be helped. First, briefly, there's a cat in the MSV house feeling poorly.

What's more, that cat feeling poorly is nearly 18 years old. Yeah. I don't wanna talk about it.

Additionally, I have been busy with Libacious. Specifically, we had a couple of jobs that wanted a bunch of original development—much more than would usually go on. First, there was a masquerade murder-mystery birthday party for 12 and 13-year-olds at Westwood, complete with pomegranate sours shaken up for the kiddos. I was not about to miss the chance to design something to pour into a coupe glass for this event.

Also, I got to wear a masquerade mask.

 photo by Casey Fox

So much fun.

That was overlapped with/immediately followed by serving the signature cocktail for Knoxville Botanical Garden and Arboretum's Green Thumb Gala. Meet the Barn Raiser.

There's a bunch of stuff in here: Assam tea spiced with allspice, black pepper, and cinnamon; fig-turbinado syrup; lemon juice; vodka; orange bitters; and orange blossom water—all garnished with sage leaves pinned to dehydrated orange slices and star anise.

I built the Barn Raiser from scratch, beginning with a single cocktail and scaling it all the way up to 380 servings. It was both nerve-racking and ultimately confidence-boosting, and, happily, brings us to today's recipes.

The fig-turbinado syrup is totally lovely. It obviously works in drinks (alcoholic or otherwise), but you can also drizzle it over vanilla ice cream or use it to jazz up breakfast.

New waffle recipe coming very, very soon, by the way.

What's more, when you finish making the syrup, you'll have some rehydrated figs on your hands, which means you're only moments away from a seriously dreamy batch of fig paste.

Which brings us to a note on instant entertaining, in case it helps anyone. Lots of tips you find online for items to keep on hand for surprise guests involve animal products, so it seems worth noting that a vegan platter does not have to be a chore. I hosted a business meeting on short notice (with Libacious' wildly talented graphic designer, Tricia Bateman), at which I knew we'd be having some special celebratory cocktails all the way from Edinburgh (brought back, thoughtfully, by my business partners).

And I never feel entirely comfortable serving drinks without something to nibble on. I had only about 20 minutes to get something onto the table. If I'd had just 15 or 20 minutes more, an almond pâté log would definitely have been the savory spread on the table, but them's the breaks.

Clockwise from left: lemony chickpea, artichoke, and red pepper spread; two cracker varieties; fig paste; and rosemary mixed nuts.

The artichoke hearts, chickpeas, and red peppers all came straight from the pantry to combine with olive oil, lemon-infused grapeseed oil, a little lemon juice, salt, and dried herbs. That's it. The mixed nuts were purchased roasted and salted. Then there was nothing left to do but briefly toast them on the stovetop with a small amount of olive oil and fresh rosemary.

Tiny crispy fried rosemary needles are hopelessly irresistible, you know.

And, finally, the fig paste. I grabbed a handful of rehydrated figs from the comically large batch on hand from syrup testing and blended it up with a little brandy, dried sage, orange exract, and a touch of orange blossom water (since the figs absorb syrup, not just water, the mixture is plenty sweet already). The whole thing still tastes like spreadable figs, but the additions give the paste a very subtle depth that keeps it from being one-note.

For instant entertaining, you do not have to have pre-soaked figs on hand. Begin your preparations by rehydrating figs (or any dried fruit you have in the cabinet). They will soften while you arrange everything else, then you can finish by blending them up into your paste (sweeten gently, to taste).

It's also especially nice baked into fig bars (instant breakfasts!) or dolloped on a cracker atop Kite Hill cream cheese.

Dead Simple Fig Syrup and Fig Paste

Print the recipe

yields about 10 oz syrup and a scant cup paste

For the syrup:

1 cup water

1 cup turbinado/demerara sugar

1 cup packed dried figs [see Note], roughly chopped

For the paste:

1 tsp brandy

1/4 tsp dried rubbed sage

1/4 tsp orange extract

pinch flaked sea salt

two drops orange blossom water (optional, or substitute with a pinch orange zest)

Begin by making syrup. Heat water and turbinado in a medium pot over high heat, stirring to help dissolve sugar. As soon as it begins to boil, add chopped figs, and bring back to a boil. Remove from heat, cover with a clean kitchen towel, and let steep one hour. Strain, pressing gently on figs to extract some of the absorbed liquid. Chill syrup in an airtight container.

To make the fig paste, transfer steeped figs to a food processor bowl. Add all other paste ingredients and process to a uniform paste. Store fig paste in the refrigerator, but it's best served at room temperature and will readily soften if heated briefly in the microwave.

Note: either Calimyrna or black mission figs may be used. The former will give a gentler flavor and sweetness that is particularly nice alone, while the latter will come through a bit bolder and makes a wonderful, traditional-feeling fig bar. Both are tasty, so follow your bliss.

Comment

Comment

Party Animals No. 52: Dinner with Pals ftr Almond Pâté Log Crostini

Hey, welcome. Consider following MSV on Twitter and subscribing to the RSS feed, or sign up for email updates right over here.

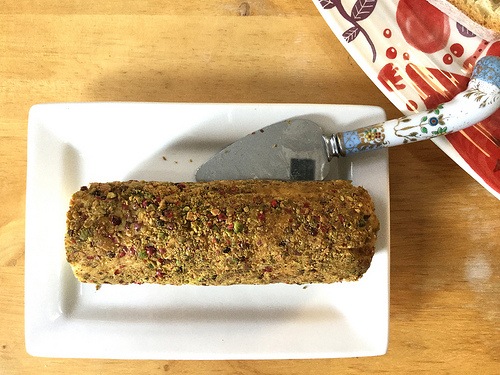
Almond pâté is a tried and true entertaining dish around these parts. It's a dead-simple, totally tasty way to swiftly change nearly any given omnivore's mind about what vegan food can taste (and look) like. Turns out, if you replace the liquid in the recipe with a little extra-firm tofu, you get a rich, salty dough stiff enough to be shaped into a log and rolled in all kinds of great garnishes.

This particular dish was inspired by a roasted grape and beet salad from New Vegetarian featuring medallions of dairy cheese rolled in pistachio crumbs. One very successful little almond pâté experiment later, and there's no doubt about how to substitute for anything similar in the future. My log was rolled in not only pistachio crumbs, but also pink peppercorns for flecks of rosy color and a little extra spice.

For the crostini that went to dinner, toasted baguette slices were topped with baby arugula tossed in an apple-ginger dressing (straight from that salad recipe in New Vegetarian), then topped with slices of the almond pâté log and finished off with tender roasted grapes. So nice.

Almond Pâté Log with Pistachios and Pink Peppercorns

Print the recipe

yields about 16 servings, adapted from here (post includes original credit links)

1/4 cup roasted and salted pistachio meats

2 tsp pink peppercorns

150 g blanched almond meal

1/2 cup crumbled extra-firm tofu

1/4 cup lemon juice

3 TBSP canola or grape seed oil

1 small clove garlic, peeled

1 tsp fine sea or kosher salt

Heat oven to 350.

In a food processor, process pistachios to medium-coarse crumbs. Add peppercorns and pulse a few times to break up gently. Spread mixture out onto a pie plate and set aside.

Wipe out processor bowl, wipe off blade, and reassemble. Add all remaining ingredients to processor and process until smooth. Lay out a piece of aluminum foil large enough to roll the log in. Remove processor blade, scrape off, and use your hands to scoop dough from processor bowl. Shape into a log roughly two and a half inches thick and six inches long. Roll log slowly in pistachio crumbs, pressing down very gently as you go to encourage cohesion, then use your hands to pat the mixture onto the exposed ends (and any missed spots you may have). Transfer to bottom edge of foil, roll up, fold in ends, and bake 40 minutes.

Note that the log is softer when warm. If you prefer to spread the pâté, serve a little warm. To slice, let cool before serving. To get the very cleanest slices, chill before cutting. Best served at room temperature, give or take.

And there was dessert. Here, the German apple cake from The Joy of Vegan Baking, wherein sliced figs were swapped for the called-for sliced apples. The very gentle sweetness of this cake is one of the reasons I love it, but for entertaining purposes, it could've used a little drizzle of something to help it feel more decadent. Pretty nice, nevertheless.

And that brings us right into meteorological fall. Expect more celebrations of that soon.

Comment

Comment

Party Animals No. 51: Libacious (Soft) Launch Party

Hey, welcome. Consider following MSV on Twitter and subscribing to the RSS feed, or sign up for email updates right over here.

So, hey, I started a cocktail catering company, Libacious, with my friends Casey Fox and Jesse Mayshark. And we threw a party. And I made food for it. (With no pictures. I know!) But there are lots of cocktail and people photos taken by the wonderful Holly Rainey.

But first! The drink menu:

The Vicki Brown's Planter's Punch was my baby and was served with a really pretty ice ring (stuffed with orange slices, lime slices, and wee rehydrated rose petals) that I can't believe I didn't take a picture of. I guess that's what the new-business butterflies do to me.

The food table:

  • Smoky almond pâté with crackers
  • Mixed root chips
  • Dried apricots and cherries
  • Garden ceviche ("Ceviche de Vegan" from Pure Vegan)
  • Sliced peaches roasted with chamomile-apple syrup topped with vanilla whipped coconut cream

Lotsa lovely people drinking lovely drinks:

There are more photos on our site, of course.

As you may have guessed, I've been busy with this. The idea is that Libacious won't affect MSV. One of the reasons I publish only once a week is that it's a not-terribly-demanding schedule that I can maintain over a long period of time—come what may, more or less. And I've pretty consistently maintained that schedule with only a handful of missed weeks over the years, through stresses big and small. But I'd like to ask you to bear with me if I happen to miss a week. It's been a turbulent spring and summer in ways both exciting and trying. And I'm deeply human.

For now, though, thanks bunches for reading. And if you're in the Knoxville area, check Libacious out. We'd love to help you throw a killer party. You can also get a peek at our service by attending the McClung's All That Glitters: A Gilded Age Cocktail Party. There will be sequins, oh, yes.

Comment

2 Comments

Party Animals No. 50: Saturday Brunch with Pals

Hey, welcome. Consider following MSV on Twitter and subscribing to the RSS feed, or sign up for email updates right over here.

Just a quick Party Animals post this week to run over a recent vegan brunch. The potato-iest, herb-iest meal of the day.

I was hosted for brunch by good pals, and they provided some really tasty grits and greens for the center of the meal. To help out, I brought bubbly for Bellini (and back there in the corner is some cucumber-lemongrass syrup as a modest gift for the hosts).

These are the easiest potatoes ever. The freezer was holding a good amount of potato salad leftover from the wedding party. Threw that in a pan and roasted it up.

For protein, tofu and zucchini muffins. These are kind of a variation on this recipe (I hope to share more about a version of these muffins soon-ish). They're flavored with lemon zest and dill, which is a really great combination for brunch.

And, finally, if you're gonna rush tomato season (which I clearly am), this is how to do it: tuck some little garlic slices into roma tomato quarters, place them in a pan, douse the whole thing with herbes de Provence and some olive oil. Roast for a couple hours at 300, and done.

As ever, thanks so much for being here. See you next week.

2 Comments

Comment

Party Animals No. 49: The MSV Wedding Reception

Hey, welcome. Consider following MSV on Twitter and subscribing to the RSS feed, or sign up for email updates right over here.

So, I got hitched in May to my boyfriend of 10 years. And yeah, I did the food for our (teeny tiny) party. There's so much credit to give out, so let's dive right in.

First, all of these seriously dreamy photos were taken by the totally fabulous Leah Moyers. She improved our wedding day in so many ways, and has made my food look better than it will ever look again. Despite knowing that we devoted a significant chunk of our wedding day's relatively modest budget to her services, I still feel like I owe her so many extra thanks. Also, hey, she's vegan.

Quickly, though this isn't something I normally talk about on MSV, my hair was done by my regular stylist, Emily, who is also vegan, and works at Geo Hair Lab (they do not use products tested on animals or containing animal products). I did my own makeup with Tarte products.

Okay, now for the food! I got tons of support from friends:

My pal Caitlin is responsible for all the stunning calligraphy you see (in addition to being on assist all evening, ferrying food up and down the staircase). Her work elevated the food presentation dramatically.

Friends Casey and Elaine ran the beverages like bosses, including hauling in lovely glassware (and so much more). Elaine—hospitality and ice cream master—also put together the table decor and basically acted as my day-of coordinator. All the great plating, arranging, and everything everything everything was directed by Elaine, and I'll never be able to repay her dedication to putting together a killer party.

This shot demonstrates just how thoughtful my friends were in providing stemware. And also what public speaking is like for me.

I can't begin to list all the credit that's due these folks and others, so just know they totally ran the show, and I had very little to do with any of it once the food was made. Even with the party as small as it was (about three dozen total), this was easily the largest crowd I'd ever cooked for, and I couldn't have done it alone. All I had to do was make the almond pâté tower, the sandwiches, the pickled green beans, and the four desserts. Got them to the church on time, so to speak, and sighed while everyone else took over. I'm a lucky lady.

Pals working while I celebrate

Additionally, we asked for volunteers among our guests to pick up food and bring it in to the party (our party was extremely intimate—only the people who love us very best in the world were there, the kind of folks you don't mind asking to stop and bring in some taro chips, if they don't mind). So anything marked store-bought in the menu was generously provided by guests so I had several less things to handle.

And now, the menu:

Hors D'oeuvres Buffet                                                                                                

  • Almond pâté tower (four-tier):                                                                                               
    • top tier: red wine-fig jam marbled (app. 3")                                                                                    
    • third tier: peppercorn-crusted (app. 4")                                                                                            
    • second tier: smoked tea (6")                                                                                
    • bottom tier: lemon zest and herbes de Provence (9")
  • Assorted Crackers (store-bought)                                                                                                
  • Mixed nuts (store-bought)                                                                                                
  • Fresh fruit (from Tomato Head catering)                                                                                         
  • Dried fruit (store-bought)                                                                                                
  • Mixed olives (store-bought)                                                                                                
  • Spiced balsamic pickled green beans                                                                                              
  • Taro chips (store-bought)                                                                                                
  • Greek green salad (from Tomato Head catering)                                                                              
  • Spring potato salad (from Whole Foods catering)                                                                           
  • Buffalo (vegan) meatball sandwiches                                                                                               
  • Smoked-tofu bánh mì                                                                                              
  • Marinated veg & chickpea-salad sandwiches (a variation on this)                                                                                               

Dessert Buffet                                                                                                
                                                                                                

Drinks

  • Cucumber-lime agua fresca (plus another agua)
  • Cocktail: 212 (gin, Aperol, grapefruit juice) topped with ginger beer (and garnished with lemongrass straws—Elaine's seriously gorgeous finishing touch)
  • Coffee from K Brew (they substituted almond milk for the creamer in their catering packs for me easy peasy)
  • beers, wines, cava, water

And, finally, the moment we've all been waiting for, the food photography:

Phew. And <3.

Comment

Comment

Party Animals No. 48; Hitting the Books No. 7: White Chocolate Truffles

Hey, welcome. Consider following MSV on Twitter and subscribing to the RSS feed, or sign up for email updates right over here.

Just a short and sweet Party Animals (and a sort-of online edition of HtB) post today to show off these absolutely heavenly truffles. Your food processor turns shredded coconut and macadamia nuts into a rich paste, then melted cacao butter and sugar ride in to smooth it all out. Blissfully, dangerously easy to make.

The recipe comes from Minimalist Baker. The only liberty I took was to finish the truffles in cacao nibs (broken down in the food processor) instead of more coconut, but follow your bliss.

Photograph by Leah Moyers. (More on that later!) Leah also alerted me to this recipe, so three cheers for that lady.

Thanks for reading. See you back here next week.

Comment

Comment

Party Animals No. 47: Big Ears Brunch 2017

Hey, welcome. Consider following MSV on Twitter and subscribing to the RSS feed, or sign up for email updates right over here.

Big Ears brunch, 2017 edition! (Past years: 2014, a tiny peek at 2015, and 2016.)

In addition to coffee on the hot end, there were four chilled drinks on offer:

  • pineapple-carrot-chamomile juice topped with sparkling water
  • blueberry-mint Bellini
  • apricot-ginger Bellini
  • ginger shandy made with Harpoon UFO White

All four garnished with a lime wedge (easy peasy).

The main focus this year was breads and things. There were biscuits with tempeh-walnut patties (not pictured), everything bagels, wheat toast, and pecan-raisin toast.

And the toppers, from right to left:

No one went hungry.

There were also some fork foods to round out the table. On the left is a fruit salad of mixed grapes and halved strawberries tossed with a little oil, a dose of apple-chamomile molasses (the best fruit booster, by the way—adds tart and sweet in one go), and finely chopped mint. On the right is a dish of black beans and tomatoes simmered with cumin, coriander, smoked paprika, and Mexican oregano. Into a giant baking dish they went. The top was studded with slices of polenta, which were brushed with a mix of olive oil, nutritional yeast, and kala namak before baking. Hearty and comforting and seriously spiced. Finally, a big bowl of this potato salad was served, but with roasted cauliflower florets substituted for the potatoes (with all the bread on hand, potatoes seemed a bit much). Parsley for the herb. It was a hit, as ever. Seriously, take that salad to the next party you go to.

So there you go. This was decidedly a generous vegan brunch. And a great festival.

Back next week with a new recipe. Thanks for reading.

Comment

Comment

Lavender and Lemon Cheesecake

Hey, welcome. Consider following MSV on Twitter and subscribing to the RSS feed, or sign up for email updates right over here.

Generally, MSV posts stick to explaining why the dish of the week works. It talks about what flavor combinations are contained within the recipe, and how that's effective, or what addition keeps your protein salad from being deadly boring (or even what makes it interesting, depending on the recipe). But this cheesecake? Well, it's totally lovely. It's a little floral, a little bright, sweet, rich, and creamy. It pretty much sells itself. It's also a special occasion kind of deal—not at all inexpensive—the kind of dessert you pause to scrape a vanilla bean for.

The only thing to note, really, is that the crust here is softer than a cookie crust, made with almond flour because it's destined to entertain a gluten-free pal. Feel free to make whatever vegan crust you like if you have a favorite and don't want to splurge on almond flour (though it's always worth having a pound or three in the pantry).

So let's depart from the formula and instead stop to appreciate how far vegan cooks have taken vegan food. After nearly two years of wishing I had some reason to go bananas over aquafaba (aside from that meringue French toast recipe that really, really needs an update and somehow never, ever gets it), I finally have one for you here. The cake part of this cheesecake is made with Kite Hill brand cream cheese and whipped aquafaba. So that means blended, strained, and cultured almonds combined with the liquid from a can of beans makes this totally delicious and elegant dessert. And it didn't even occur to me that that was strange in the slightest until it was time to write about this guy.

We've come a long way. We have a truly impressive toolbox that keeps getting better. Thanks to everyone working out there. You're the best.

And, hey, make this totally gorgeous cheesecake next time you have friends to feed.

Lavender and Lemon Cheesecake with an Almond Crust

Print the recipe

1/2 cup chickpea brine (aquafaba*)

2 TBSP dried lavender

1 1/2 cups blanched almond meal

1 cup natural cane sugar (evaporated cane juice), divided

1 tsp psyllium husk powder

pinch salt

1/3 cup canola oil

24 oz plain cream cheese, such as Kite Hill brand

1/4 cup lemon juice

contents of half a vanilla bean

Bring chickpea liquid to a boil in a small pot over high heat. Remove from heat, stir in lavender, cover with a clean kitchen towel, and steep two hours.

When your aquafaba is nearly done steeping, heat oven to 350. In a 9-inch springform pan, combine almond flour, 1/4 cup sugar, psyllium husk powder, and salt. Whisk to combine thoroughly. Add canola oil, stir with a fork until uniform, and press the crust into the bottom of the pan with your hands (be sure to press firmly around the edges, too). Bake 12 minutes.

Meanwhile, add remaining 3/4 cup sugar to the bowl of a stand mixer. Strain chickpea liquid into the bowl and discard lavender. Add whisk attachment. Turn mixer on low to combine ingredients, then turn to medium-low speed and beat one minute. Turn up to medium speed and continue to beat four minutes. The mixture should now be thick, fluffy, and hold tracks but will still flow back into the bowl from the whisk.

Meanwhile, beat together cream cheese, lemon juice, and vanilla with a wooden spoon. Add to whipped aquafaba, switch to the paddle attachment, and beat on low speed just until combined. Pour into prepared crust. Drop pan on the counter once to try to minimize air bubbles. Bake 50-53 minutes, until lightly browned on top. Cake center will be wobbly when removed from oven and will firm as it cools. Cool in the pan on a wire rack until cooled completely. Remove pan sides and chill. Best served slightly chilled.

(*I used Trader Joe's organic chickpeas. The brine is slightly thicker than in TJ's conventional canned chickpeas. One can of Trader Joe's organic chickpeas has repeatedly yielded more than 1/2 cup total brine, so you need only one can with this brand.)

Comment

6 Comments

Lime and Thyme Blueberry Bundt Cake

Hey, welcome. Consider following MSV on Twitter and subscribing to the RSS feed, or sign up for email updates right over here.

You must make this cake. Make it for all the special occasions, big or small.Make it for yourself to linger over. Make it for anyone and everyone you love. It's so easy and dead lovely.

The first bite will hit you with the sweet toasted wheat flour and thyme. The second bite will surely reveal one of the many berries studded throughout. Wait for it, and you'll notice how the thyme makes a blissful complement to the blueberries and brings out the depth of their flavor. All the while, the lime syrup that coats the exterior keeps flavors bright.

Those berries, by the way, are dried wild blueberries, which makes this cake even easier to make (if more expensive). And the way dried berries plump up and tenderize in baked goods is truly one of the distinct pleasures of the oven.

Now, credit where credit is due. When the seriously fabulous (and fellow Knoxvillian!) Heather Baird of SprinkleBakes posted her very-first-ever vegan cake, there was no choice but to make it as quickly as I could. But obviously not the exact cake she made because that requires time, patience, skill, candy, and fondant. None of which are things I bring to baked goods. But on the MSV shelf is a handy bit of visual inspiration called Luscious Berry Desserts. Around here, it gets used mostly as inspiration for ways to serve fresh fruit gorgeously. But it also includes a pound cake (also not something that happens in the MSV kitchen) flavored with lime, thyme, and plenty of blueberries.

Put them together, and heaven on Earth is achieved.

Lime and Thyme Blueberry Bundt Cake

Print the recipe

serves 8-10, adapted from SprinkleBakes and Luscious Berry Desserts

2 cups full-fat coconut milk

4 sprigs fresh thyme (each 4-5 inches in length)

3 cups all-purpose flour

2 tsp baking powder

1 tsp salt

4 tsp lime zest, divided

2 cups natural cane sugar (evaporated cane juice), divided

1 cup canola oil

2 tsp vanilla extract

1 cup dried wild blueberries

1/2 cup lime juice

Heat oven to 350. Oil and flour a Bundt pan.

Add thyme sprigs to coconut milk in a small pot and bring to a boil over high heat. Remove from heat and let steep 10 minutes. Discard thyme. Set coconut milk aside to let cool.

Sift together flour, baking powder, and salt.

Separately, whisk together 2 tsp lime zest, coconut milk, 1 1/2 cups sugar, oil, and vanilla.

Add wet ingredients to dry and whisk until almost mixed. Add blueberries, stir just until combined, and pour batter into prepared pan. Bake 55-60 minutes, or until a tester comes out clean. Cool 20 minutes in pan on a rack.

Meanwhile, heat remaining 1/2 cup sugar, remaining 2 tsp zest, and lime juice over high heat. Stir to dissolve sugar. Once the mixture boils, remove from heat and let stand five minutes.

Turn out cake onto your cooling rack, and place a pan underneath to catch excess syrup. Pour lime syrup slowly over the warm cake and let cool completely before cutting.

6 Comments

Comment

Party Animals No. 46: Thanksgiving 2016

Hey, welcome. Consider following MSV on Twitter and subscribing to the RSS feed, or sign up for email updates right over here.

The all-vegan MSV Thanksgiving table for 2016 went a little something like this:

To welcome our guests, a version of this spiced pear and ginger cocktail. Totally lovely. This'll definitely show up on the MSV entertaining table again. (Also, I went a little bananas and made botanical drawings to accompany all the items.) Get my (slightly simplified) version of this great cocktail here.

Tofu-pecan loaf and fluffy biscuits (same as last year).

A lackluster citrus and green bean salad that I'll replace next year. Win some, lose some.

Cranberry relish, same as ever.

A first stab at horchata cheesecake that decidedly needs more tests. Still tasted good, though.

And, finally, the pleasant surprise of the year. I tweaked my regular dressing to streamline the process. I replaced the corn bread (which I used to bake a day or two before) with store-bought prepared polenta, replaced the figs (which I used to soak and chop) with already-small currants, and took the walnuts down just a bit. The result is totally dreamy and a little more harmonious than my old dressing. This couldn't have worked better. I seriously recommend this recipe over the old one. The polenta's creaminess adds an unbeatable textural improvement that I refuse to do without from here on.

______________________________________________________________________________

If you got a long weekend, I hope it was lovely.

MSV subscribers (you can join their ranks if you haven't already) got a little note about this in their emails, but I'm taking this week off, leaving the blog quiet for now while the East Tennessee communities try to work through this week's damage in The Great Smoky Mountains National Park and nearby towns.

See you again soon.

Comment

Comment

Dead Simple Pear Tart for MSV's Fourth Anniversary

Hey, welcome. Consider following MSV on Twitter and subscribing to the RSS feed, or sign up for email updates right over here.

Four years of MSV! I hope you're as jazzed as I am. Let's eat dessert. And let's not spend too much effort making it.

In fact, ease has been a major theme on MSV over the past year. When I started MSV, I had been vegan for only a year. This blog gave me a place to direct my energy and figure out a new way of eating. I had endless patience—enthusiasm, even—for experimentation.

Four years later, I have less patience, but more experience. I still screw up in the kitchen, of course, but I generally have a better sense of what works for me. One thing that hasn't changed in these four years is my fundamental preference for freshness, but the way I pursue that now looks much different than the way I did it back then. Now I'm much more focused on offering everyday foods, stuff you can take for lunch—important tools to help people keep plants at the center of their diet. And though the protein question is sometimes tossed around as a tiresome inquiry, I don't mind taking the question at face value and answering it two weeks out of the month, or whenever I come up with a good answer.

That's the public part of the way I've come to shape this blog. Privately, I'm a little more focused on working pleasing food into my life rather than making food my main hobby. That means spending less time in the kitchen without sacrificing pleasure by recognizing that sweet spot of low effort and high return.

Enter this lovely pear tart. Pie dough actually isn't a big deal. Once the sleeves are rolled up, there's nothing to it but to do it. And the end result is so good. But for some reason, I dread the idea of making it. And so this dead-simple shortbread-style press-in crust (you may have noticed) has become my go-to crust. It's rich, it has a wonderfully firm texture that shatters satisfyingly under tooth, and it takes stunningly little effort to make. I add cornmeal for a little texture and extra flavor, and because I never stop putting cornmeal in all my baked goods for a little texture and extra flavor.

This really is designed to scratch the pie itch without having to touch the rolling pin. To do that, you'll essentially marry a tart with a fruit crisp. The crumble topping is lovely and effortless, but the flavor and richness is bolstered by the addition of almond flour. For the filling, thinly sliced pears are tossed with apricot jam to give the fruit that, well, jammy quality that's usually achieved in a pie by baking fresh fruit with starch under the top crust. Buy the best apricot jam you're willing to spring for, and you're all set. Here's a tip: choose the least expensive apricot jam with apricots listed as the first ingredient. For the best flavor, skip anything that lists sugar first.

And there you have it. Easy enough for your kids to help you make it (if you have those), and good enough to entertain with.

Here's to four years! I can't thank you enough for being here.   —Amanda

Dead Simple Pear Tart

Print the recipe

serves 6-8

For the crust:

1 cup all-purpose flour

1/3 cup cornmeal

1 TBSP natural cane sugar (evaporated cane juice)

1/2 tsp fine sea or kosher salt

1/3 cup melted refined coconut oil

For the filling:

2 medium just-ripe green pears, thinly sliced

1/4 cup apricot jam

2 TBSP lemon juice

1/2 tsp vanilla extract

pinch fine sea or kosher salt

For the topping:

1/4 cup rolled oats

1/4 cup blanched almond meal

1 TBSP turbinado

1 TBSP melted refined coconut oil

pinch fine sea or kosher salt

Heat oven to 375.

Begin with the crust. Whisk together flour, cornmeal, sugar, and salt. Add coconut oil and mix until sandy and uniform. Press into a 14x4-inch nonstick rectangular tart pan. Bake 13-15 minutes. The crust will go from done to burned with speed, so watch—and smell—carefully.

Meanwhile, toss filling ingredients until uniformly coated. In another bowl, stir all topping ingredients together with a fork until uniformly coated.

When the crust is done, remove from oven and reduce heat to 350. Add pears evenly to crust. Sprinkle topping over pears. Bake until pears are tender and topping is golden, 17-20 minutes. Transfer to a wire rack to cool in the pan. Remove tart pan sides after tart has cooled. Serve at room temperature.

Comment

Comment

Cherry Tart with a Dead Simple Salted Chocolate Crust

Hey, welcome. Consider following MSV on Twitter and subscribing to the RSS feed, or sign up for email updates right over here.

This guy is gonna sell itself. Grab your dark cherries, season them a little on the stove, then pile them into an entirely lovable chocolate crust—with little hits of salt strewn throughout—that just happens to be the very definition of forgivable.

And because glossy fruit begs to be paired with creamy things, take a minute to whip up a combination of nondairy cream cheese and silken tofu for a dreamy effect that's stiffer than whipped cream, but fluffier than cream cheese. It's a really handy combination, and you can likely expect to see it here again in other applications.

Top the whole thing with fruit, swirl it around for a nice presentation, and you'll be one happy summer camper. And because you need to make this tart in advance, anyway, it's a seriously easy way to entertain.

Cherry Tart with a Dead Simple Salted Chocolate Crust

Print the recipe

serves 6-8

For the crust:

3/4 cup all-purpose flour (to measure, spoon in and level off)

1/4 cup cocoa powder, such as Equal Exchange brand

1/3 cup natural cane sugar (evaporated cane juice)

1/2 tsp fine sea or kosher salt

1/4 cup refined coconut oil

For the cherry filling:

1 lb pitted dark cherries, frozen or fresh

2 TBSP natural cane sugar (evaporated cane juice)

juice of half a lemon

2 TBSP quick-cooking tapioca

1/2 tsp vanilla extract

For the creamy filling:

6 oz firm silken tofu (half of an aseptic pack)

4 oz nondairy cream cheese, such as Tofutti brand

2 tsp natural cane sugar (evaporated cane juice)

1 tsp vanilla extract

1/2 tsp lemon zest

Heat oven to 375.

Begin with the crust. Whisk together flour, cocoa powder, sugar, and salt. Add coconut oil and mix until sandy and uniform. Press into a 14x4-inch nonstick rectangular tart pan. Bake 8-10 minutes. The crust will go from done to burned with speed, so watch—and smell—carefully. Transfer pan to a wire rack to let cool.

Prepare the cherry filling. Combine cherries, sugar, and lemon juice in a small pot over medium heat. Bring to a boil and let cook until cherries have released their liquid and begin to break down, about 10 minutes. Reduce heat slightly (to avoid splashing) and add tapioca. Cook, stirring frequently, five minutes. Remove from heat, stir in vanilla, and set aside to let cool a bit.

Finally, prepare the creamy filling. Puree all ingredients until very smooth.

When the crust has cooled, add all but one-half cup of cherry filling. Dollop and smooth creamy filling over the top. Dollop reserved half-cup of cherry mixture over that, and swirl with a chopstick by making infinity marks up and down the length of the tart. Chill at least a couple of hours before removing tart pan side piece and serving. During this time, the cherry filling will become more sliceable and the flavor of the creamy filling will come together. Fillings will continue to firm up over the next six to eight hours.

Tart will keep in the fridge, covered, for a few days.

Comment