Comment

Artichoke and Poblano Almond Pâté

Hey, welcome. Consider following MSV on Twitter and subscribing to the RSS feed, or sign up for email updates right over here.

Almond pâté is great, but it's so rich that it tends to get reserved around here for entertaining. But today's version may change that.

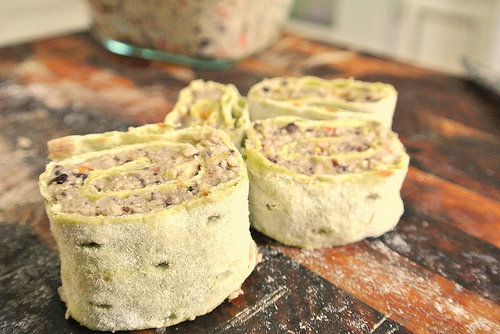
Today's creamy little wheels of joy come packed with a good dose of bright artichokes and gently spicy poblano peppers. The natural bitterness of green veg plays well with the natural sweetness of blanched almond meal.

The result is a predictably pleasing spread that comes across a little lighter thanks to that flavor tweak, plus the extra bulk from the finely chopped veggies.

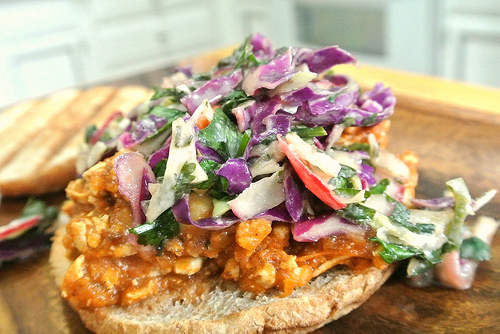
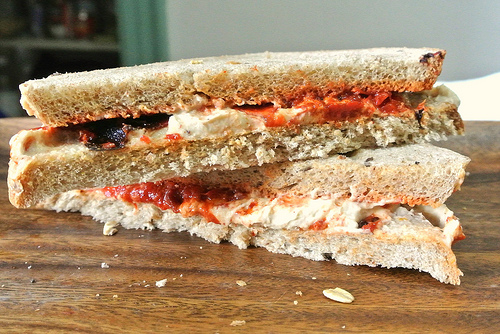
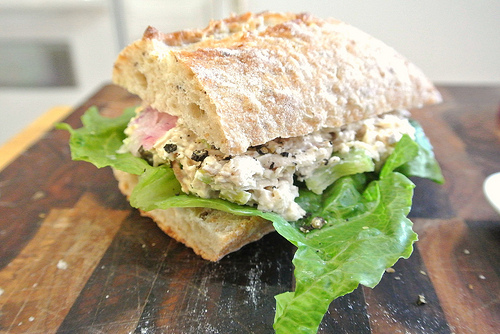
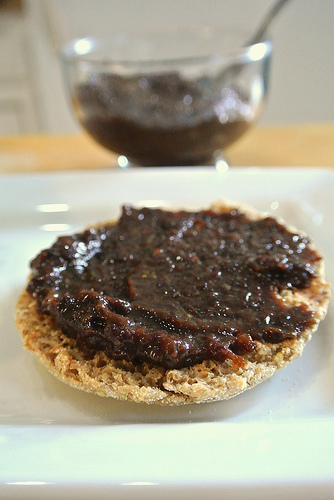
Keep a batch of of this stuff in the fridge and get ready to seriously—and effortlessly—elevate your sandwiches. And pretty much anything else you put in your pie hole.

Artichoke and Poblano Almond Pâté

Print the recipe

serves 4-8, adapted from here (post includes credit links)

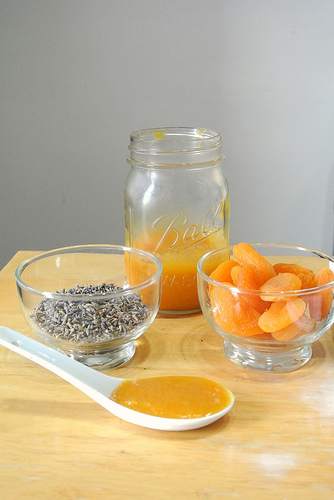
3 oz (app. 3/4 cup) frozen artichoke hearts, thawed

1 small poblano (2 1/2-3 oz total weight), trimmed, seeded, veined, and roughly chopped

1 tsp lime zest

150 g blanched almond meal

1/4 cup lime juice

1/2 cup unsweetened soy milk

3 TBSP olive oil

1 small clove garlic

1/2 tsp fine sea or kosher salt

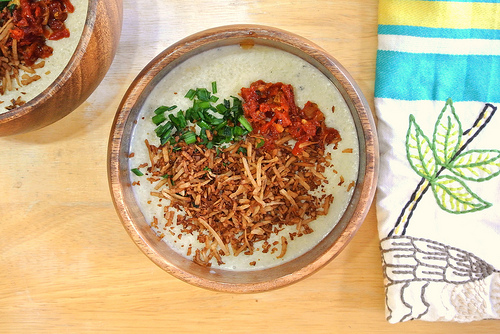
Use a food processor to finely chop artichoke hearts and poblano. Add lime zest to processor bowl and set aside.

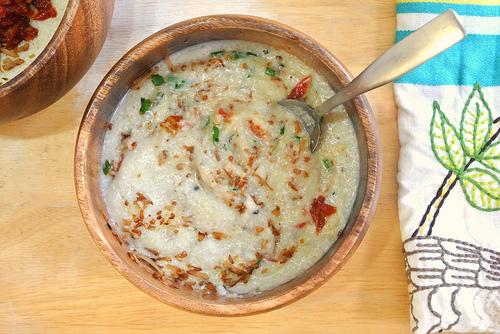
Blend all other ingredients with an immersion blender until smooth. Stir in veggies and lime zest.

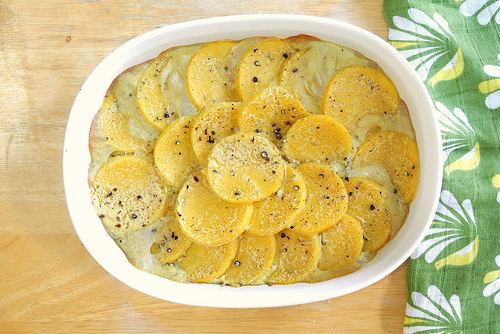
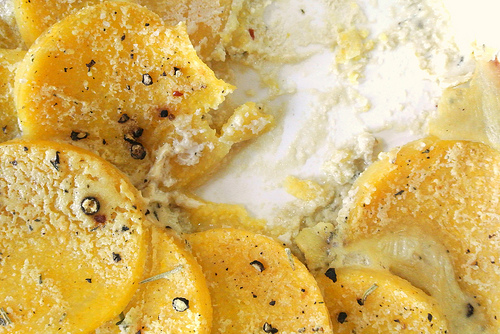
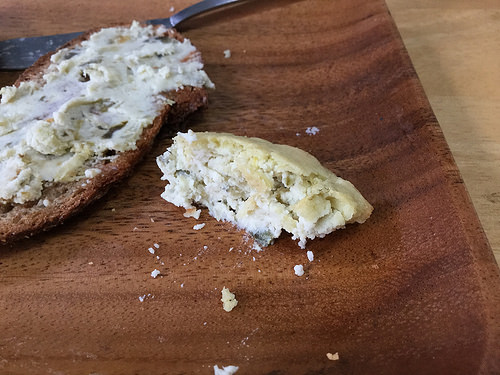
For a softer spread, heat oven to 350. Divide evenly between two 10-oz ramekins. Bake 40-45 minutes, or until puffed and golden brown on top. The spread can be used immediately as a tart base before baking, or let cool before serving on a tartine or crackers.

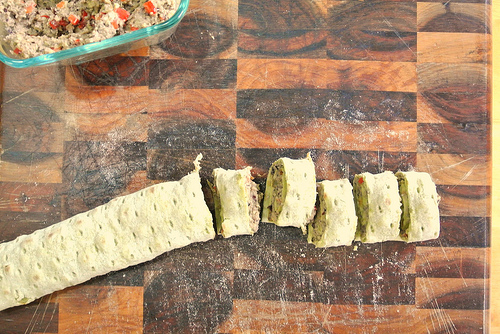
Alternately, to mold, line two 10-oz ramekins with a double layer of cheesecloth. Divide the mixture evenly between the ramekins, fold cheesecloth over, and chill for at least 3 hours, or up to overnight. (In a pinch, chill in the freezer for 30 minutes.)

Heat oven to 350. Use the cheesecloth to lift the pâté from the ramekins, carefully transfer to an oiled (or parchment-lined) baking sheet (without cheesecloth), and bake 40-45 minutes, or until golden.

Let cool thoroughly before transferring to the refrigerator. This pâté improves as it sits, when the flavors have had a good chance to mingle.

Comment

4 Comments

Lentil, Spinach, and Rosemary Crisp

Hey, welcome. Consider following MSV on Twitter and subscribing to the RSS feed, or sign up for email updates right over here.

Lentil and spinach soup is probably the most common dish that gets thrown together in the MSV kitchen when there aren't any other bright ideas floating around. It's warm, earthy, comforting, full of protein, and ensures at least some chlorophyll makes it into the gut for the day.

Today, you get a little twist on that easy dish that increases the comfort factor by adding a crispy layer up top, and increases the dreamboat factor by folding fresh rosemary into that topping. For the tiniest bit of extra effort, you get a charming little meal.

Bonus: it's so easy. Nothing to saute, hardly anything to chop. Just throw it all in the pot and let it go. And if you make the whole thing in a Dutch oven, there's only one dish to wash at the end of the night. Okay, that and the small bowl you mix your topping in. Still, not bad.

Lentil, Spinach, and Rosemary Crisp

Print the recipe

serves 4

For the base:

2 1/2 cups water

8 oz brown lentils

8 oz frozen spinach

1 no-salt-added vegetable bouillon cube

2 TBSP nutritional yeast

2 tsp Dijon-style mustard

1/t tsp dried thyme

1/2 tsp dried oregano

1/2 tsp fine sea or kosher salt

For the topping:

1/2 cup panko crumbs

1/4 cup rolled oats

1/4 cup all-purpose flour

1 TBSP chopped fresh rosemary

1/8 tsp fine sea or kosher salt

2 TBSP olive oil

Add all base ingredients to a dutch oven and stir. Cover and bring to a boil over high heat. Stir again, reduce heat to low, and cover. Cook 25 minutes.

In the last five or so minutes of cooking, heat oven to 350.

Remove lentils from heat and stir. The lentils should be almost done, and most of the water should have been absorbed, but there will still be some liquid in the bottom of the pot.

In a small mixing bowl, stir together all topping ingredients except olive oil. Add oil and stir with a fork until uniform. Crumble evenly over lentils.

Bake, uncovered, 18 minutes. Switch oven to the broiler and broil 3-5 minutes to brown the topping, being careful not to burn. Let rest 10 minutes before serving.

4 Comments

Comment

The Basics No. 3: Black Beans and Rice with Roasted Plantains

Hey, welcome. Consider following MSV on Twitter and subscribing to the RSS feed, or sign up for email updates right over here.

Continuing the MSV tradition of posting a helpful staple recipe at the turn of the calendar, today you get beans and rice. It doesn't get much more basic for vegan food, and for good reason. The combination of legumes and grains is seriously satiating, and it's an easy to dish to bolster with veggies and keep fresh with various spices, not to mention bean varieties. And finally, all you need is a garnish to make a simple, blissfully affordable meal feel fully formed (and good enough to serve friends).

Pico de gallo or a sofrito are always welcome toppings, but it's winter. So, to today's combo of black beans, coriander, cumin, and smoked paprika, you'll add an equally satisfying and equally easy helping of roasted plantains. A tiny bit of seasoning is all they need before getting totally delicious in the oven. (My favorite source for plantains in town is El Girasol. They keep three big boxes in the produce section for plantains in various stages of ripeness—green, yellow, and nearly ripe—so you can buy them to suit your timeline.)

The whole thing makes for a great meal that comes together breezily. The rice cooks while the plantains roast, and the beans simmer on the stove with their seasoning while the rice cooks. As ever, you can certainly make your beans from scratch. You can save money, control the texture better, and get deeper flavor if you do. But canned beans are wildly convenient and allow you to put a hearty meal together on short notice. Either way, you're well fed.

Black Beans and Rice with Roasted Plantains

Print the recipe

serves 4-6

2 ripe plantains

2 tsp olive oil

1/4 tsp ground cinnamon

pinch ground cayenne (optional)

pinch fine sea or kosher salt

2 cups water

1 no-salt-added vegetable bouillon cube

1 cup long-grain brown rice

2 15-oz cans black beans

1 small dried bay leaf

1 tsp smoked paprika

3/4 tsp ground coriander

3/4 tsp ground cumin

1/2 tsp fine sea or kosher salt

Heat oven to 400. Line a baking sheet with parchment.

Peel and slice plantains into diagonal chips about 1/2-inch thick. Add slices to a mixing bowl with oil, cinnamon, cayenne (if using), and pinch salt. Toss gently with your hands until uniformly coated. Transfer to prepared baking sheet in one layer and bake 15-20 minutes on each side, or until tender and golden.

Meanwhile, heat water in a medium pan and dissolve bouillon cube into it. Carefully measure out a half-cup broth and set aside. Cover pot, bring to a boil, and add rice. Replace the cover, bring back to a boil, and reduce heat to low. Cook, undisturbed, 25 minutes, or until all liquid is absorbed.

Add reserved half-cup broth to a small pan. Drain beans (do not rinse) and add to pot. Cover and heat over medium heat. Add bay leaf, paprika, coriander, cumin, and salt. Bring to a simmer, reduce heat to low with the lid cocked, and continue to simmer gently, stirring occasionally, while the rice and plantains cook. Five minutes before serving, remove beans from heat. They will remain saucy but thicken as they cool.

Serve beans over rice and garnish with plantain slices.

Comment

Comment

Baked Apples with Molasses & Spice Crumble

Hey, welcome. Consider following MSV on Twitter and subscribing to the RSS feed, or sign up for email updates right over here.

So that's a pretty ugly-looking dish up there, but you really want to make it, anyway. Because while not a visual show-stopper, the combination of tart and sweet apples, apricot jam, vanilla, molasses, cinnamon, nutmeg, and brown sugar all baked together create an aroma that will make your knees buckle. It's incredible. And dead-simple to throw together whenever you feel like something sweet.

And the flavor's not so bad, either. The molasses obviously makes a stickier topping than you'd get from a classic crisp topping, but it also compacts the volume and concentrates the flavor. Pair that with a deep dish of tender apples with a little bite left in them, and you have the easiest path to a seriously satisfying little dessert. Transform leftovers into breakfast by tempering the sugar with a dollop of plain nondairy yogurt.

Baked Apples with Molasses & Spice Crumble

Print the recipe

serves 6

1 large (10-12 oz) sweet apple, such as Honeycrisp

1 small-medium (8-10 oz) tart apple, such as Granny Smith

1/2 cup apricot jam (look for a brand that lists apricots as the first ingredient)

1/2 tsp vanilla extract

fine sea or kosher salt

1/2 cup rolled oats

1/2 cup almond flour (or all-purpose flour)

1/2 tsp ground cinnamon

1/4 tsp freshly grated nutmeg

2 TBSP turbinado (or brown sugar)

2 TBSP canola oil

2 TBSP blackstrap molasses

Heat oven to 350.

Core apples and slice thinly into 1/8-inch-thick slices. Add to a mixing bowl with jam, vanilla, and a pinch of salt. Stir until well combined and transfer to a deep 8-inch round dish (an 8x8 square pan should also work).

To the same mixing bowl, add oats, almond meal, cinnamon, and nutmeg. Toss to combine. Add turbinado, oil, and molasses. Stir with a fork until uniformly moistened. Dollop topping over apples, spread out to cover evenly with wet hands or the wet back of a spoon. Bake 25-30 minutes, until apples are tender (but not too soft) and topping is browned and very fragrant.

Let cool 10 minutes before serving.

Note: while hot, the jam and apple juices will remain syrupy but will firm up into a loose jammy consistency as the dish cools.

Comment

Comment

Hitting the Books No. 6: Isa's Jumbo Oatmeal Cookies + BBQ Tofu and Thai-Inspired Slaw

Hey, welcome. Consider following MSV on Twitter and subscribing to the RSS feed, or sign up for email updates right over here.

Today, recipe test-drives from Isa Does It (also at the library, for Knoxville folks), Pure Vegan, and Christopher Kimball's new Milk Street Magazine. Without further ado, first up is this BBQ-sauced tofu sandwich:

I don't actually have a go-to BBQ sauce, and have long assumed the Date Barbecue Sauce from Pure Vegan (recipe available here) would be one. Alas. A little too mild, decidedly sweet, this one did not hit my sweet spot. It's possible swapping fresh ginger for the called-for ground ginger could adjust the spice to suit my tastes. But honestly, I don't care enough to try. The first recipe from Pure Vegan I won't revisit.

The slaw from Milk Street Magazine, on the other hand, is a winner. Thai food is famous for balancing bold flavors—savory with sweet, fat with acid—then often adding heat from fresh chiles. Those principles are taken to this slaw that is now my go-to. The lime and coconut milk dressing will likely show up here soon in another application (or three). Get the recipe here, and to make it vegan, swap reduced-sodium tamari for the called-for fish sauce.

Next up, dessert. And/or gifts.

Isa Does It has become an invaluable book on the MSV shelf. I've toyed with the idea of giving up my copy of Veganomicon more than once—I cook from it so infrequently and book space is valuable in my small-ish place—but I cannot imagine parting with this one.

These jumbo oatmeal cookies are totally easy and really fun. This is definitely a recipe to turn to again and again, using whatever is in the pantry. The cookies shown here, which were a gift, include some chocolate I'd just been given. In that went (in fat chunks), along with currants already in the cabinet. Tie them up in a bow, and done. Remember to save yourself at least one for tomorrow's breakfast.

Thanks so much for reading. Merry Christmas to those who celebrate. Let's all breathe a huge sigh of relief that the solstice has come and gone, and the days are officially getting longer. See you next week.

About Hitting the Books: You know that shelf in your house with all the great cookbooks you don't get to nearly as often as you'd like? Yeah, there's one of those over here, too. The Hitting the Books series allows for occasional opportunities to dig into that shelf and highlight some handy cookbooks.

Comment

Comment

Roasted Red Pepper Hot Sauce (From the Pantry)

Hey, welcome. Consider following MSV on Twitter and subscribing to the RSS feed, or sign up for email updates right over here.

It's not unusual to find hot sauces with veggie bases, like habanero sauce with a carrot base, or harissa. But ease is the name of the game here. Granted, you do have to roast peppers (but no peeling!), but that's absolutely it. So grab your spice rack, a lemon, and fresh pepper, and get to know a slightly fresher hot sauce you'll find yourself whipping up on a regular basis.

Naturally, it's fabulous on avocado toast, scrambles or hashes, and makes totally nice hummus sandwiches.

For a low-effort hot meal you can even serve to pals, roast a pan of cauliflower and potatoes with some kidney beans underneath with salt, pepper, and garlic. You can roast the peppers at the same time. Blend up your sauce, mix it with a little plain nondairy yogurt (Forager brand is excellent for this) and go to town.

Roasted Red Pepper Hot Sauce (From the Pantry)

Print the recipe

2 fresh red peppers, trimmed, seeded, and halved

1/4 cup olive oil

2 TBSP fresh lemon juice

1 TBSP smoked paprika

1 tsp fine sea or kosher salt

1/2 tsp ground cayenne

1/2 tsp garlic powder

1/4 tsp freshly cracked black pepper

1/4 tsp lemon zest

Heat oven to 425. Roast pepper on the middle rack (but placed directly under the heat source to the left or right, not in the middle), cut side-down until tender and dark, 35-40 minutes.

Add all other ingredients to a food processor. Carefully add roasted peppers and blend until thoroughly combined and just a little chunky. Sauce will keep, refrigerated in an airtight container, for about a week.

Comment

Comment

Lavender and Lemon Shortbread

Hey, welcome. Consider following MSV on Twitter and subscribing to the RSS feed, or sign up for email updates right over here.

Today, a little something you're definitely going to want to add to your December cookie jar.

First of all, this is a shortbread cookie, so it's rich and basic in the best way. But next, we tweak. Powdered sugar—which is cut with corn starch—will get you the lightest cookie possible, and it's usually what I'd use. But today, we're infusing the sugar in the cookies with fragrant dried lavender and bright and floral lemon zest. It's a hauntingly delicate and subtle effect, and I wanted a firmer structure, an emphatic little crunch to ground the ethereal fragrance and keep the whole thing from becoming too precious. So regular cane sugar it is.

And since shortbread cookies are sinfully easy to make, they make wonderful last-minute gifts. The lavender and lemon additions make them so lovely and thoughtful that everyone will be too busy enjoying the cookies to question the effort you put in. The recipe halves and doubles well, so make as many, or as few, as you need.

If you do give them as gifts, packing them in mason jars in parchment cups with extra dried lavender poured over makes for a nice presentation and extra scent. Highly recommended.

Lavender and Lemon Shortbread

Print the recipe

yields about 20 cookies

1 TBSP dried lavender flowers

zest of 1 lemon

1/4 cup natural cane sugar (evaporated cane juice)

1/2 cup nondairy butter, such as Earth Balance

1/4 tsp fine sea or kosher salt

1 cup all-purpose flour (measure by spooning in and leveling off, not scooping)

The day before you want to make the cookies, stir together lavender, lemon zest, and sugar in a small airtight container. Let sit 24 hours. Run sugar through a sieve into your mixing bowl to extract the scented sugar. Add a few pinches (app. ½ tsp) lavender-zest mix to the mixing bowl with the scented sugar. Reserve remaining lavender and zest for another purpose (such as tisane).

Cream sugar, butter, and salt until smooth, pausing to scrape the sides of the bowl as needed, if using a stand mixer. Add flour. Mix until fully combined and dough begins to come together. Form into a rough log with your hands, kneading a bit to bring the dough together fully. Transfer to a piece of parchment. Shape into a neat 5x2-inch log. Roll up in the parchment and chill one hour.

Heat oven to 325. Line a baking sheet with parchment.

Use a sharp knife to cut the chilled dough into 1/4-inch-thick slices. Working quickly, lay cookies on the lined baking sheet. Bake on the center rack until fragrant and lightly browned, 20-23 minutes. Let cool one minute, then carefully transfer to a wire rack to cool completely. Cookies will crisp as they cool.

Comment

Comment

Party Animals No. 46: Thanksgiving 2016

Hey, welcome. Consider following MSV on Twitter and subscribing to the RSS feed, or sign up for email updates right over here.

The all-vegan MSV Thanksgiving table for 2016 went a little something like this:

To welcome our guests, a version of this spiced pear and ginger cocktail. Totally lovely. This'll definitely show up on the MSV entertaining table again. (Also, I went a little bananas and made botanical drawings to accompany all the items.) Get my (slightly simplified) version of this great cocktail here.

Tofu-pecan loaf and fluffy biscuits (same as last year).

A lackluster citrus and green bean salad that I'll replace next year. Win some, lose some.

Cranberry relish, same as ever.

A first stab at horchata cheesecake that decidedly needs more tests. Still tasted good, though.

And, finally, the pleasant surprise of the year. I tweaked my regular dressing to streamline the process. I replaced the corn bread (which I used to bake a day or two before) with store-bought prepared polenta, replaced the figs (which I used to soak and chop) with already-small currants, and took the walnuts down just a bit. The result is totally dreamy and a little more harmonious than my old dressing. This couldn't have worked better. I seriously recommend this recipe over the old one. The polenta's creaminess adds an unbeatable textural improvement that I refuse to do without from here on.

______________________________________________________________________________

If you got a long weekend, I hope it was lovely.

MSV subscribers (you can join their ranks if you haven't already) got a little note about this in their emails, but I'm taking this week off, leaving the blog quiet for now while the East Tennessee communities try to work through this week's damage in The Great Smoky Mountains National Park and nearby towns.

See you again soon.

Comment

Comment

Dead Simple Polenta and Herb Gratin

Hey, welcome. Consider following MSV on Twitter and subscribing to the RSS feed, or sign up for email updates right over here.

Creamy, comforting, a little rich but not greasy, seriously fragrant, and seriously easy to throw together, this wildly handy and tasty polenta gratin is likely to be on heavy rotation all fall and winter long. It gives big return for simply slicing, whisking, pouring, and baking.

The trick here is taking advantage of prepared polenta. You'll dress it up with dried herbs (making this a fabulous pantry recipe), soy milk, and almond meal. Admittedly, making your own polenta in advance will probably make this taste even better, but this recipe about convenience. The effect is obviously different from a traditional potato gratin, but you still get lots of creamy, carb-y goodness with a fraction of the work.

This will effortlessly round out any simple meal, like a green salad with some beans or tofu for protein. Or serve it with scrambled tofu and baked apples for brunch. And it will be right at home on any big fall holiday table, if you happen to have one of those coming up.

Dead Simple Polenta and Herb Gratin

Print the recipe

serves 4-6

18 oz polenta (1 prepared tube)

3/4 cup unsweetened soy milk

1/4 cup blanched almond meal

1 TBSP nutritional yeast

rounded 1/4 tsp fine sea or kosher salt (plus additional for finishing)

1/4 tsp garlic powder

1/4 tsp dried thyme

1/4 tsp dried oregano

1/4 tsp dried rosemary

pinch crushed red pepper

freshly cracked black pepper

Heat oven to 375.

Slice polenta into thin (scant 1/4-inch) slices and arrange in an overlapping spiral pattern in a 1 1/2-quart baking dish (shallow, app 9"x12"). Whisk together measured salt, garlic powder, thyme, oregano, rosemary, and red pepper. Pour slowly and evenly over polenta. Sprinkle top with a pinch of additional salt and add freshly cracked black pepper, to taste. Bake until polenta is lightly crusted and bubbly, 35-40 minutes.

If desired, finish under broiler to give the top a golden brown finish in spots. Let cool 5-10 minutes before serving.

Comment

Comment

Lavender Apricot Butter

Hey, welcome. Consider following MSV on Twitter and subscribing to the RSS feed, or sign up for email updates right over here.

Sunny apricots, seriously fragrant lavender, orange zest (and juice) all make this apricot butter floral, sweet, and overall incredibly handy to have in your refrigerator.

A good fruity condiment turns a muffin into a treat and ordinary sandwiches into lunches worth lingering over. Bonus: this apricot butter is really easy to make. It simmers away on its own while you do whatever you like. Give it a puree, and you're set for days.

Lavender Apricot Butter

Print the recipe

yields about 1 1/2 cups

1 cup unsweetened, unfiltered apple juice

3 TBSP dried lavender

1 orange

heaping 1/2 cup dried apricots

Heat apple juice until hot, but not boiling. Add lavender, cover with a clean kitchen towel, and let steep 30 minutes. Strain and discard lavender.

Meanwhile, take one teaspoon of zest from the orange and add it to a small pot. Juice orange into a measuring cup. If needed, add enough water to yield a half-cup of liquid. (If you recover more than a half-cup of juice from the orange, reserve excess for another purpose.) Add orange juice to pot along with apricots. Cover pot with a clean kitchen towel and set aside.

When apple juice is ready, add to pot. Cover, bring to a boil, and reduce heat to low. Simmer, covered, 30 minutes. Carefully transfer apricots and remaining liquid to a wide-mouth pint jar and puree with an immersion blender. Let cool completely, covered loosely with a kitchen towel, before refrigerating.

Comment

Comment

Vegan BLT Grits

Hey, welcome. Consider following MSV on Twitter and subscribing to the RSS feed, or sign up for email updates right over here.

Today, a grits recipe that's easy enough to put together on any given morning (thanks to quick-cooking grits) and fun enough to serve guests for brunch.

You'll start with grits (or polenta) and add richness with soy milk and almond meal, then add interest to all that creamy starch with a good helping of freshly cracked black pepper. It's really that simple to turn out satisfying grits (that don't sit like a brick in your gut).

You'll jazz the whole bowl up with finely chopped sun-dried tomatoes, fresh chives (that admittedly stretches the L in BLT pretty far, but it's worth it), and—best of all—a dose of stovetop coconut bacon. The recipe is adapted from Colleen Patrick-Goudreau, but where she gives instruction for a huge batch, the one here—provided you have access to a non-stick skillet—allows you to make small amounts fresh whenever you feel like it, without bothering with the oven. Additionally, it turns up the salty punch just a touch by using shredded coconut instead of flaked. More surface area means a smaller garnish goes a long way.

Vegan BLT Grits

Print the recipe

serves 2 generously

For the grits:

1/2 cup quick-cooking grits (or polenta)

1/4 cup blanched almond meal

3/4 tsp fine sea or kosher salt

1/2 tsp freshly cracked black pepper

1 1/2 cups unsweetened soy milk

1 1/2 cups water

To serve:

2 TBSP drained sun-dried tomatoes packed in oil, finely chopped

2 TBSP snipped chives

Coconut Bacon, recipe follows

Begin by making the coconut bacon and set aside while you prepare the grits.

Whisk together grits, almond meal, salt, and pepper in a bowl. Combine soy milk and water in a pot over high heat. When it begins to steam, begin whisking while pouring the grits mixture into the pot in a thin, steady stream, whisking all the while. When all is incorporated, be sure the mixture is bubbling, cover, and reduce heat to low. Cook five minutes, covered, carefully whisking the bubbling mixture once each minute.

Meanwhile, chop sun-dried tomatoes and snip chives.

When grits are ready, divide among two bowls. Stir in sun-dried tomatoes and chives. Serve at once, topping the bowls with coconut bacon at the table, as desired. The coconut should be added only just before serving, as the steam from the hot grits will soon turn the coconut from crisp to chewy.

Coconut Bacon

yields 1/4 cup, adapted from Colleen Patrick-Goudreau

1 tsp reduced-sodium tamari

1/2 tsp liquid smoke

1/4 tsp maple syrup, grade B preferred

1/4 cup shredded unsweetened coconut

Heat a nonstick skillet over medium heat. In the skillet, combine tamari, liquid smoke, and maple syrup. The second it begins to boil, sprinkle coconut over and stir until thoroughly mixed. Continue cooking for a few minutes—stirring every 20-30 seconds—until coconut absorbs all liquid, the skillet becomes dry, and coconut just begins to crisp in spots. Your nose is your best guide. When it smells deeply toasted and just shy of burning, quickly remove from heat and immediately transfer to a plate, spread out in a single layer. Coconut will continue to crisp as it cools.

Comment

Comment

Autumn Fattoush-Inspired Salad with Tahini-Dijon-Herb Dressing

Hey, welcome. Consider following MSV on Twitter and subscribing to the RSS feed, or sign up for email updates right over here.

This is such a simple but totally lovely—and seriously satisfying—salad. Start by combining only a few elements that play very well together: fresh romaine, mild and hearty chickpeas, vegetal and crisp celery, plus sweet and crisp apple. Meanwhile, chop a small pita loaf and toss the chunks with za'atar and and olive oil, then throw them under the broiler until crispy.

Finally, there's the dressing. It comes together in a snap with an immersion blender, and contains a whole lot of flavor: tahini, lemon, Dijon-style mustard, garlic, and parsley (or chives). It's a fabulous dressing for this salad, with its emphasis on fresh ingredients. (You may want to use the dressing regularly on your other green or grain salads, but keep in mind that it's both acidic and salty, so avoid adding particularly salty or pickled ingredients to your salads before testing it out all together.)

Autumn Fattoush-Inspired Salad with Tahini-Dijon-Herb Dressing

Print the recipe

serves 2 as a main or 4 as a side

For the salad:

2 romaine hearts

1 15-oz can chickpeas

2 medium stalks celery

1 medium sweet apple, such as Honeycrisp

For the pita croutons:

2 small pita loaves (scant 6-inch-diameter), cut into 1-inch cubes

1 tsp olive oil

1/2 tsp za'atar

pinch fine sea or kosher salt

For the dressing:

1/4 cup tahini

2 TBSP lemon juice

2 TBSP water

1 TBSP Dijon-style mustard

1/2 tsp fine sea or kosher salt

1/2 tsp garlic powder

1/4 cup tightly packed parsley leaves [see variation note, below]

Chop romaine hearts into thin strips. Add to serving bowl. Drain and rinse chickpeas in a fine sieve. Set aside to let drain thoroughly. Meanwhile, chop celery thinly and cut apple into 1/2-inch dice. Add to serving bowl.

Heat oven broiler. Toss pita cubes with olive oil. Sprinkle za'atar and salt over top, then toss again. Thoroughly toast cubes on second rack from the broiler until crisp, watching very carefully to avoid burning.

Use an immersion blender to puree all dressing ingredients in a wide-mouth pint jar until smooth. Add chickpeas and crisped pita to serving bowl. Add dressing and toss salad until thoroughly combined. Serve at once.

[Variation: as desired, substitute all or part of the parsley with roughly chopped fresh chives.]

Comment

Comment

Smoked Tofu Salad Sub

Hey, welcome. Consider following MSV on Twitter and subscribing to the RSS feed, or sign up for email updates right over here.

Your lunches are totally covered. Sunny October afternoon picnics, too. And thanks to commercially prepared smoked tofu, this satisfying baguette sub couldn't be easier.

Start with your smoked tofu, grate it, add a good bit of plain nondairy yogurt (Kite Hill or Silk recommended), and season that with lemon juice, cornichons, and capers.

Technically, you can stop right there, grab the crackers, and call it good. Or you can sandwich it up with romaine and top with salt, pepper, oil, red wine vinegar, and thinly sliced red onion. Totally classic presentation with a blissfully flavorful convenience item. Meet your new favorite protein-salad sandwich.

Smoked Tofu Salad Sub

Print the recipe

serves 3-4

For the smoked tofu salad:

8 oz smoked tofu, grated, such as Soy Boy brand

5 oz plain nondairy yogurt, such as Kite Hill or Silk brand

1 6-inch piece celery, thinly sliced

4-6 cornichons (1 to 1 1/2 inches each), finely chopped

2 tsp drained capers

2 tsp lemon juice

1/2 tsp garlic powder

1/4 tsp fine sea or kosher salt

To serve:

baguette loaf

romaine leaves

red onion, sliced into paper-thin half-moons

olive oil

red wine vinegar

fine sea or kosher salt

freshly cracked black pepper

Stir all tofu salad ingredients together.

To serve, cut off a desired length of baguette and split in half lengthwise. Line bottom slice with romaine. Spoon tofu salad on top, pressing down a little to aid cohesion. Top with onion, to taste. Drizzle oil over top, add several dashes red wine vinegar, and finish with a gentle sprinkle of salt and a generous amount of freshly cracked black pepper.

Note: for travel, toast cut sides of bread before assembling. Will keep well, wrapped, for a few hours.

Comment

Comment

Dead Simple Pear Tart for MSV's Fourth Anniversary

Hey, welcome. Consider following MSV on Twitter and subscribing to the RSS feed, or sign up for email updates right over here.

Four years of MSV! I hope you're as jazzed as I am. Let's eat dessert. And let's not spend too much effort making it.

In fact, ease has been a major theme on MSV over the past year. When I started MSV, I had been vegan for only a year. This blog gave me a place to direct my energy and figure out a new way of eating. I had endless patience—enthusiasm, even—for experimentation.

Four years later, I have less patience, but more experience. I still screw up in the kitchen, of course, but I generally have a better sense of what works for me. One thing that hasn't changed in these four years is my fundamental preference for freshness, but the way I pursue that now looks much different than the way I did it back then. Now I'm much more focused on offering everyday foods, stuff you can take for lunch—important tools to help people keep plants at the center of their diet. And though the protein question is sometimes tossed around as a tiresome inquiry, I don't mind taking the question at face value and answering it two weeks out of the month, or whenever I come up with a good answer.

That's the public part of the way I've come to shape this blog. Privately, I'm a little more focused on working pleasing food into my life rather than making food my main hobby. That means spending less time in the kitchen without sacrificing pleasure by recognizing that sweet spot of low effort and high return.

Enter this lovely pear tart. Pie dough actually isn't a big deal. Once the sleeves are rolled up, there's nothing to it but to do it. And the end result is so good. But for some reason, I dread the idea of making it. And so this dead-simple shortbread-style press-in crust (you may have noticed) has become my go-to crust. It's rich, it has a wonderfully firm texture that shatters satisfyingly under tooth, and it takes stunningly little effort to make. I add cornmeal for a little texture and extra flavor, and because I never stop putting cornmeal in all my baked goods for a little texture and extra flavor.

This really is designed to scratch the pie itch without having to touch the rolling pin. To do that, you'll essentially marry a tart with a fruit crisp. The crumble topping is lovely and effortless, but the flavor and richness is bolstered by the addition of almond flour. For the filling, thinly sliced pears are tossed with apricot jam to give the fruit that, well, jammy quality that's usually achieved in a pie by baking fresh fruit with starch under the top crust. Buy the best apricot jam you're willing to spring for, and you're all set. Here's a tip: choose the least expensive apricot jam with apricots listed as the first ingredient. For the best flavor, skip anything that lists sugar first.

And there you have it. Easy enough for your kids to help you make it (if you have those), and good enough to entertain with.

Here's to four years! I can't thank you enough for being here.   —Amanda

Dead Simple Pear Tart

Print the recipe

serves 6-8

For the crust:

1 cup all-purpose flour

1/3 cup cornmeal

1 TBSP natural cane sugar (evaporated cane juice)

1/2 tsp fine sea or kosher salt

1/3 cup melted refined coconut oil

For the filling:

2 medium just-ripe green pears, thinly sliced

1/4 cup apricot jam

2 TBSP lemon juice

1/2 tsp vanilla extract

pinch fine sea or kosher salt

For the topping:

1/4 cup rolled oats

1/4 cup blanched almond meal

1 TBSP turbinado

1 TBSP melted refined coconut oil

pinch fine sea or kosher salt

Heat oven to 375.

Begin with the crust. Whisk together flour, cornmeal, sugar, and salt. Add coconut oil and mix until sandy and uniform. Press into a 14x4-inch nonstick rectangular tart pan. Bake 13-15 minutes. The crust will go from done to burned with speed, so watch—and smell—carefully.

Meanwhile, toss filling ingredients until uniformly coated. In another bowl, stir all topping ingredients together with a fork until uniformly coated.

When the crust is done, remove from oven and reduce heat to 350. Add pears evenly to crust. Sprinkle topping over pears. Bake until pears are tender and topping is golden, 17-20 minutes. Transfer to a wire rack to cool in the pan. Remove tart pan sides after tart has cooled. Serve at room temperature.

Comment

Comment

Dead Simple Warming Sweet Potato and Black Bean Soup

Hey, welcome. Consider following MSV on Twitter and subscribing to the RSS feed, or sign up for email updates right over here.

This brightly colored bowl really puts the potato back in sweet potato. Leaving the skin on the sweet potatoes here emphasizes their earthy quality over their sweetness, and spiking the pot with two chile powders adds a lovely warmth in the back. Nutritional yeast, a touch of garlic, and a bouillon cube add extra savory notes. To bump up the protein, plus add texture and visual interest, toss in a can of black beans at the end. (And to bump up the protein even more, you'll puree in a can of chickpeas.)

In the end, you have a simple, comforting, portable (tip: store leftover soup in mason jars), everyday meal that contains a bunch of stuff that's good for you (and a ton of it, too). And the only thing you have to chop is a couple of sweet potatoes. How's that for everyday eats?

But if you want to take an extra minute to whip up a little coconut bacon to sprinkle on top while the soup cooks, no one would question you.

Dead Simple Warming Sweet Potato and Black Bean Soup

Print the recipe

serves 10-12

8 cups water

24-26 oz sweet potato (2 large), cubed

1 15-oz can chickpeas (or white beans), drained

1/4 cup nutritional yeast

1 clove garlic

1 Not-Chick'n bouillon cube

1 tsp ancho powder, or other mild chile powder

1/2 tsp cayenne powder

1/2 tsp dried oregano

1/2 tsp fine sea or kosher salt

1 15-oz can black beans

Add all ingredients, except black beans, to a soup pot over high heat. Cover and bring to a boil. Reduce heat to maintain a strong simmer and let cook, covered, 25-30 minutes, or until potatoes are tender.

Meanwhile, drain and rinse black beans in sieve. Set aside to let drain well.

When the potatoes are tender, remove pot from heat. Carefully puree the soup with an immersion blender until very smooth. Return pot to heat, add black beans, and heat until beans are warmed through. Adjust salt, if needed.

Comment

Comment

Savory Tarragon and Black Pepper Loaf

Hey, welcome. Consider following MSV on Twitter and subscribing to the RSS feed, or sign up for email updates right over here.

If you find yourself regularly wishing savory snacks were as easy to grab on the run as sweet ones, today's recipe is going to help you out.

This simple savory quick bread is dense, moist, and seriously tasty. Fresh tarragon lends it fragrance while freshly cracked black pepper gives it heat. A touch of sugar both takes the edge off the tarragon and pulls out the flavor of the modest dose of cornmeal you'll throw in.

The loaf makes a great snack all on its own and plays extremely well with fruit jams. If you're in search of an easy meal, it also makes a really lovely tartine with Dijon mustard, seared tempeh, fresh apple slices (hello, fall), and a little arugula. And probably any other open-faced sandwich you can dream up.

Savory Tarragon and Black Pepper Loaf

Print the recipe

yields 8 servings

1 1/2 cups all-purpose flour

1/4 cup cornmeal

1 TBSP baking powder

1 tsp psyllium husk powder (optional—assists binding)

1 TBSP finely chopped fresh tarragon

1 tsp fine sea or kosher salt

1 tsp freshly cracked black pepper

1 cup unsweetened soy milk

1/2 cup plain soy yogurt, such as Silk brand

1/4 cup canola oil

1 TBSP natural cane sugar (evaporated cane juice)

Heat oven to 350. Oil a 9x5" loaf pan.

Sift together flour, cornmeal, baking powder, and psyllium husk powder, if using. Stir in salt, pepper, and tarragon.

Separately, whisk together milk, yogurt, oil, and sugar. Add wet ingredients to dry and stir just until combined. Transfer batter to loaf pan and bake 43-45 minutes, or until a tester inserted into the center of the loaf comes out clean.

Let cool in the pan on a wire rack, 10 minutes. Carefully and gradually work the loaf loose from the sides and bottom of the pan with a very thin metal spatula. Turn out onto wire rack and let cool. Leftovers should be wrapped tightly, but keep well for several days at room temperature.

Comment

Comment

Maple-Pecan French Toast

Hey, welcome. Consider following MSV on Twitter and subscribing to the RSS feed, or sign up for email updates right over here.

September: sounds like fall, still feels mostly like summer. And this indulgent brunch dish is the perfect solution to your new cravings. All the bread, maple, and nuts associated with the cooler season without turning on the oven.

Start with a couple thick slices of sourdough, cook 'em up, and finish the whole thing off by taking an extra few minutes to put together a seriously luscious maple sauce packed with a pile of crunchy toasted pecans. So good. And so perfect for easy entertaining.

Maple-Pecan French Toast

Print the recipe

serves 2

For the French toast:

2 TBSP chickpea flour

1/2 tsp ground cinnamon

pinch salt

1/4 cup unsweetened soy milk

2 tsp coconut oil

2 half-inch-thick slices sourdough, such as Knoxville Sourdough

For the maple-pecan sauce:

2 TBSP chopped raw, unsalted pecans

2 TBSP maple syrup (grade B preferred)

2 TBSP full-fat canned coconut milk

1 TBSP turbinado

1 tsp coconut oil

pinch fine sea or kosher salt

Heat a nonstick skillet over medium heat. Dry toast pecan pieces for several minutes, tossing frequently, until very fragrant.

Meanwhile, measure out chickpea flour, cinnamon, and salt into a wide bowl. Measure out all maple sauce ingredients, except pecans, into a small sauce pan. Set aside.

When pecans are toasted, transfer to a small plate to let cool. Return skillet to heat. Add two teaspoons coconut oil to skillet. Whisk milk into chickpea flour mixture. Press bread, one slice at a time, into chickpea batter, pressing each side in for 10-15 seconds. Carefully add bread to hot skillet. Cook for 3-5 minutes, until golden. Reduce heat to medium-low, flip, and cook another 3-4 minutes, or until golden. Transfer to plates.

While French toast cooks, bring maple sauce ingredients to a boil. Reduce heat immediately to medium-low and let simmer, stirring very frequently, until thickened, but still loose enough to pour, 3-5 minutes. (If you're not sure how thick to make it, err on the side of the mixture being too thin so you don't wind up with candy stuck to your pan.)

Remove sauce from heat, stir in toasted pecans, and divide sauce over French toast. Serve at once.

Comment

Comment

Currant, Orange, and Rosemary Spread

Hey, welcome. Consider following MSV on Twitter and subscribing to the RSS feed, or sign up for email updates right over here.

This fruity treat will spoil you forever for store-bought jams. The sweet stuff—complex, sticky currants and orange juice—gets a tasteful (and tasty) assist from woodsy fresh rosemary, bitter and fragrant orange zest, and a little black pepper for a touch of warmth. It all makes for an uncommonly lovely fruit spread. (First person to try it warm on ice cream, please let everyone know how it goes in the comments.)

It's fabulous on its own with any baked good you have lying around. It can also add a layered sweet note to tofu and avocado breakfast sandwiches:

And it makes seriously seductive peanut butter and jelly sandwiches. No joke.

Currant, Orange, and Rosemary Spread

Print the recipe

yields about 1 1/3 cups

juice of two oranges

zest of half an orange

8 oz dried black currants (about 1 3/4 cups)

2 TBSP finely chopped fresh rosemary

1/4 tsp fine sea or kosher salt

1/4 tsp freshly cracked black pepper

Juice the oranges (after zesting half of one). Add enough water to the juice to get a total of one cup liquid. Add it, along with all other ingredients, to a small pot over medium heat. Cover and bring to a boil. Reduce heat to low. Let simmer 30 minutes, covered, stirring every 10 minutes. Mixture should be thickened, but some visible liquid should remain.

Carefully transfer to a mason jar and puree with an immersion blender until smooth. Let cool completely before storing in the fridge.

Comment

Comment

Tempeh Pate with Olives and Capers

Hey, welcome. Consider following MSV on Twitter and subscribing to the RSS feed, or sign up for email updates right over here.

Earthy, nutty tempeh and briny olives make a great match. This pate is a perfect example. Green olives, Kalamata olives, and capers combine with quickly steamed tempeh for a dead-simple spread that becomes more than the sum of its parts. (Naturally, the better your olives, the better the dish.) Finish it off with finely chopped fresh red pepper for a little color and crunch.

You can obviously spread this on crackers to your heart's content, but it's also quite nice on a slice of plain or spinach lavash. Apply a generous amount (about a third of the recipe) to a slice, roll it up, and slice it into little pinwheels with a sharp knife. Munch.

Admittedly, this recipe is pretty fabulous on the second day, but it's so tasty straight from the food processor that you may need to make a double batch to make it last that long.

Tempeh Pate with Olives and Capers

Print the recipe

serves 3-4

8 oz tempeh

1/4 cup pitted Kalamata olives

1/4 cup pitted green olives

1 TBSP drained capers

1 TBSP extra virgin olive oil

2 tsp lemon juice

1/2 tsp dried oregano

1/4 tsp garlic powder

1/4 cup diced (1/4-inch) red bell pepper

Steam tempeh 10 minutes. Meanwhile, rinse the olives and capers in a fine sieve. Set aside to let drain thoroughly. When the tempeh is done, set aside to let cool a bit while you chop the bell pepper.

Carefully transfer tempeh to food processor. Add oil, lemon, oregano, and garlic powder. Process until smooth (for tempeh). Add olives and capers. Process until olives are very finely chopped, pausing to scrape the sides, as needed. Add bell pepper and pulse to combine. Serve at once or chill until ready to serve.

Comment

Comment

Dead Simple Lemon-Pepper Tofu Spread

Hey, welcome. Consider following MSV on Twitter and subscribing to the RSS feed, or sign up for email updates right over here.

Tofu on bread makes up a lot of easy dinners in the MSV house. This particular spread is a favorite for a couple of reasons, though. First, lemon and freshly cracked black pepper are a lovable combination that never gets old.

Second, there's pretty much always tofu and lemon hanging out in the kitchen, which means this mellow and simple spread can be on your plate pretty much any time you decide you feel like blending up a batch. And then you have leftovers.

This spread eats just fine on toast all alone (or crackers, if you need even more convenience), but the cool creaminess of the tofu, brightness of the lemon, and heat of the pepper are even better topped with, say, a little greens quickly sauteed with smoked paprika or smoked salt. With multigrain toast, that's a lot of satisfying flavor piled deep into a blissfully unfussy meal.

Dead Simple Lemon-Pepper Tofu Spread

Print the recipe

yields about one pound

1/2 cup pepitas, roasted and lightly salted

14-16 ounces firm tofu, drained

1/2 tsp fine sea or kosher salt

2 TBSP lemon juice

zest of 1 lemon

1 tsp freshly cracked black pepper

Process pepitas in a food processor to fine crumbs. Add tofu, salt, and lemon juice, and blend until very smooth, pausing to scrape the sides as needed. Stir in lemon zest and black pepper. Adjust salt, if needed (particularly if you use unsalted pepitas). Flavor is best after chilling for an hour or so, but can be used immediately.

Comment