Comment

Fiery Cantaloupe-Cucumber Salad

Hey, welcome. Consider following us on Twitter and subscribing to our RSS feed, or sign up for email updates from the Home Page.

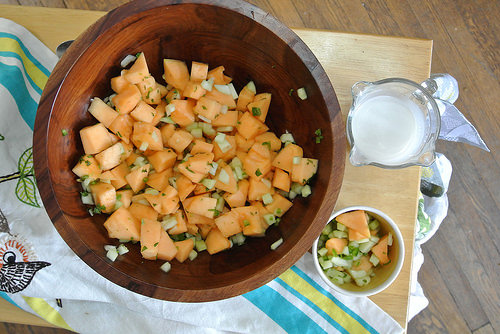
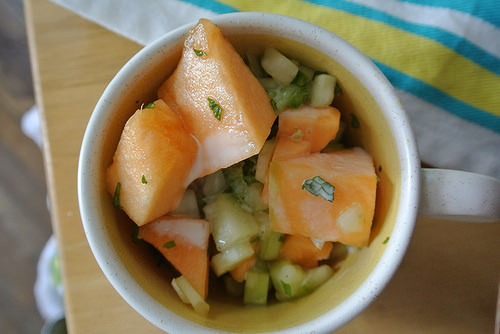
What you see is pretty much what you get here. Not the first thing you imagine when someone says "fruit salad," here sweet cantaloupe is paired with fresh jalapeno, which is tempered a bit by cucumber, mint, and a drizzle of chilled coconut milk. Entirely refreshing and a fine showcase for a good melon, this salad makes a wonderful late-summer side dish or even light breakfast (if you don't mind early-morning heat).

This is a simple one to throw together, but does require a fair amount of chopping, which we embrace as a real joy with a dish like this. Cooking involves all the senses, and chopping a variety of fresh foods provides scents and textures that can be a terrific pick-me-up after a long day. Go slow, soak in the colors and fragrances, but remember to toss on some gloves when handling hot peppers. And, naturally, if you're sensitive to spicy foods, make sure you remove all bits of vein from the jalapeno, and feel free to use a smaller quantity of minced pepper.

Fiery Cantaloupe-Cucumber Salad

Print the recipe

serves 6-8

1 medium cantaloupe, halved and seeded

2 medium cucumbers, peeled, halved lengthwise, and seeded

1 medium jalapeno pepper, halved lengthwise, seeded and de-veined

10 fresh mint leaves, finely chopped (from a couple sprigs, about 1 TBSP chopped)

juice of half a lime (about 1 TBSP)

1/2 cup full-fat canned coconut milk, chilled

pinch salt

Cut each cantaloupe half into quarters, place each chunk on its flat cut end, and carefully cut the rind away. Chop flesh into bite-size dice (about 1 inch) and transfer to a serving bowl.

Chop the cucumber into small dice (about 1/4 inch) and add to the serving bowl. Mince the jalapeno, finely chop the mint, add to the serving bowl, and toss well to combine. The jalapeno will be assertive at this point, but mellows a bit with the addition of dressing.

In a small bowl, stir together lime juice, coconut milk, and salt. It will taste fairly tart, but the lime juice will mellow once diffused through the salad.

Spoon salad into individual dishes, serve with coconut-lime mixture at the table, drizzled on individually, to taste. The salad can be served immediately or held for a couple of hours to allow the flavors to mingle. It keeps, refrigerated in an airtight container, for a day or two.

Comment

Comment

Puy Lentils Simmered in Carrot Sauce

Hey, welcome. Consider following us on Twitter and subscribing to our RSS feed, or sign up for email updates from the Home Page.

Earthy, meaty, olive-hued Puy lentils pair beautifully with the sweetness of carrots (plus, they add extra fiber). Fire up the broiler, blister a little onion and a pile of bright orange carrots, blend them into a chunky puree, then throw it all in a pot with your best lentils and let the stove take care of the rest. The result is  a simple, satisfying dish bursting with autumnal shades. Come the cooler months, feel free to throw in a little dried thyme and sage, and if you like, try roasting a small, seeded jalapeno along with the carrots and onion for a little extra warming.

Serve these lentils with any grain, or as a stand-alone salad with any flatbread or a chunk of crusty white bread. Or, if you're feeling ambitious, use these lentils as a filling for hand pies, pot pies, phyllo cigars, or anything that pleases you and yours.

Puy Lentils Simmered in Carrot Sauce

Print the recipe

serves about 6

1 pound carrots, peeled and trimmed

1 medium yellow onion, peeled and trimmed

1 tsp ground coriander

2 tsp smoked paprika

1/2 vegetable bouillon cube

4 cups water, divided

1 pound Puy lentils

1 lime, plus another, to serve, optional

hot sauce, to serve, optional

Heat oven broiler.

Meanwhile, halve carrots lengthwise and cut onion into slices. Arrange in a single layer on a baking sheet (carrots cut-side down) six inches from the heat source and broil until tender and beginning to blister in spots, about 20 minutes. Occasionally open the oven door to prevent the broiler from turning off.

Carefully add vegetables to a food processor with coriander, paprika, bouillon cube, and 1 cup of water. Blend into a chunky puree. Transfer to a pot, stir in three cups of water, and add lentils. Cover, bring to a boil over high heat, reduce heat to medium-low and let simmer, covered, until lentils are tender and most of the water is absorbed, 20-25 minutes. Reduce heat as needed to keep liquid from evaporating too quickly. If needed, uncover and simmer for a few additional minutes if the mixture is too watery (note that it will thicken as it cools).

Remove from heat, squeeze in the juice from half the lime. Taste and adjust salt and lime. Serve immediately with hot sauce or with extra small lime wedges at the table, if desired.

Comment

Comment

Dead Simple Hominy-Black Bean-Sweet Corn Salad with Arugula, Basil, and Mint

Hey, welcome. Consider following us on Twitter and subscribing to our RSS feed, or sign up for email updates from the Home Page.

Gather up a couple cans for convenience, add perky, crispy greens tossed in a quick fresh-herb and lime vinaigrette, and chow down. Totally hearty while still tasting of summer, this mix of nourishing beans, fluffy hominy, and sweet corn--flecked with bits of peppery arugula--makes a lovely lunch or dinner on even the busiest of days.

Plus, hominy: you get a dose of the flavor and chewy comfort of thick tortillas without having to make them yourself. What's not to love? (Except that they're not actual hot-from-the-griddle thick tortillas. That's one-of-a-kind magic, for sure.)

Dead Simple Hominy-Black Bean-Sweet Corn Salad with Arugula, Basil, and Mint

Print the recipe

serves 2

1 15-oz can black beans

1 15-oz can white hominy

1 cup loosely packed baby arugula

2 TBSP olive oil

1 TBSP lime juice (from about half a lime)

1/4 tsp fine sea or kosher salt

6 basil leaves, cut into chiffonade (about 1 generous TBSP chopped)

4 mint leaves, finely chopped (about 1 tsp chopped)

1 cup corn kernels (fresh or frozen, thawed)

freshly cracked black pepper

Drain and rinse the beans and hominy in a sieve. Set aside to let drain thoroughly.

Roughly chop arugula and add to a serving bowl. In a small bowl, whisk together oil, lime juice, salt, basil, and mint. Add dressing to arugula and stir until arugula is thoroughly dressed.

Once well drained, add beans, hominy, and corn kernels to the bowl. Add freshly cracked black pepper to taste. Toss well, adjust seasoning, if needed, and serve.

Comment

Comment

Southern Summer Grilled Romaine Salad

Hey, welcome. Consider following us on Twitter and subscribing to our RSS feed, or sign up for email updates from the Home Page.

As much as bowls of food are seriously beloved around the MSV kitchen, from time to time it's fun and rewarding to put together something a little more composed. So here you go: grilled romaine, black-eyed peas, salty smoked almonds, plump roma tomatoes stuffed with avocado and chives, all finished off with a light tomato vinaigrette. Pretty and tasty.

Even with all the moving parts, this salad is easy to put together, in large part because we rely on the convenience of canned beans and smoked almonds to add flavor and nutrition. Which means all you have to do is prep the tomatoes, puree the dressing, and grill the romaine. Eat up. Plus, notice how little chopping there is to do here.

Alternately, since homemade beans will always have better texture than canned, make your own black-eyed peas from dried beans a day or three in advance. Let them come to room temperature before adding them to the salad.

Southern Summer Grilled Romaine Salad

Print the recipe

serves 2

1 15-oz can black-eyed peas

4 medium roma tomatoes

salt and freshly cracked black pepper

1 TBSP olive oil

1 1/4 tsp red wine vinegar, divided

1/4 tsp dried oregano

1/4 tsp fine sea or kosher salt

flesh of 1 ripe avocado

1 TBSP finely chopped chives

1 head romaine lettuce, washed and thoroughly dried

1/4 cup salted smoked almonds, roughly chopped

Drain and rinse the beans in a sieve. Set aside to let drain thoroughly.

Meanwhile, cut the tomatoes in half lengthwise and scoop out the center flesh (discard seeds), reserving. Sprinkle the tomato shells with a pinch of salt and a bit of freshly cracked black pepper.

To the reserved tomato innards, add oil, 1 tsp red wine vinegar, oregano, and 1/4 tsp salt. Blend with an immersion blender. Taste and adjust seasoning.

Use a fork to mash avocado, remaining 1/4 tsp red wine vinegar, and chives. Spoon into tomato halves.

Heat a countertop electric grill or stovetop griddle. Cut romaine head in half lengthwise and grill for just a few minutes, until wilted up top and seared below. Place each half cut-side up on serving plates and top each with half the beans. Arrange 4 tomato halves around the lettuce on each plate, top each with half the chopped smoked almonds, and add dressing to taste.


Comment

Comment

Tempeh-Cantaloupe Skewers

Hey, welcome. Consider following us on Twitter and subscribing to our RSS feed, or sign up for email updates from the Home Page.

tempeh-cantaloupe skewers table.jpg

Earthy, nutty tempeh and tender, sweet cantaloupe are lightly coated in a blend of salty, robust red miso mixed with sesame and mirin, then seared and served atop a bed of simple, fluffy couscous tossed with fresh parsley. Dinner is colorful, fun, and on the table in under half an hour. And mirin pairs wonderfully with cantaloupe, by the way. For the best flavor and texture, be sure to choose a melon that's ripe, but not too ripe. Its flesh needs to still be firm enough to handle direct heat without falling apart.

The recipe below provides a gentle seasoning, but if you're feeling a little indulgent, no one could blame you for doubling the miso mix and brushing on a little extra after grilling. It's really good stuff. Really.

tempeh-cantaloupe skewers detail.jpg

Tempeh-Cantaloupe Skewers

Print the recipe

serves 2

1 TBSP sesame oil

2 tsp red miso

1 tsp mirin

1 tsp rice vinegar

8-oz block tempeh, steamed 10 minutes

12 generous 1-inch cubes cantaloupe (from about half a small melon)

1/2 cup water

1/2 cup couscous

generous pinch salt

1 TBSP minced parsley

Whisk together sesame oil, miso, mirin, and vinegar. When the tempeh is cool enough to handle, cut it into 12 cubes. Toss tempeh and melon in miso mixture. Set aside and heat a countertop electric grill (or stovetop griddle).

Meanwhile, bring 1/2 cup water in a small pot to a boil. Stir in couscous, salt, and parsley, remove from heat, cover, and let stand 10 minutes.

Thread the tempeh and melon onto skewers (or not) and grill in a closed grill for 3-4 minutes (per side, if using stovetop griddle), until tempeh is fragrant, warmed through, and has golden sear marks. Fluff couscous with a fork before serving.

Comment

2 Comments

Apple Juice-Braised Chickpeas with Tomatoes and Turmeric

Hey, welcome. Consider following us on Twitter and subscribing to our RSS feed, or sign up for email updates from the Home Page.

Let the slow cooker make full-on comfort food appetizing--and effortless--even in summer. Easy to love and dead simple, this chickpea dish can please a crowd on any given weeknight. The recipe below serves two but should multiply like a dream.

The important bit here is to use an unfiltered apple juice that contains nothing but pressed apples. We grabbed ours at Three Rivers, but the natural foods section of any large grocer should be able to help you out. The sweet-tart apple juice and the acid from the tomatoes combine beautifully with golden turmeric and a touch of ginger and allspice. The result goes down way easy.

To really drive home the comfort, we piled our chickpeas atop a mound of fluffy mashed potatoes, but any grain--rice, couscous, polenta/grits, what have you--will work. And note that the chickpeas hold up well to the long cooking. Other beans may get mushy, but feel free to experiment (and we can't wait to try this with diced tempeh).

Apple Juice-Braised Chickpeas with Tomatoes and Turmeric

Print the recipe

serves 2, adapted from The Apple Cookbook

1 15-oz can chickpeas, drained and rinsed

1 tsp ground turmeric

1/4 tsp ground ginger

pinch ground allspice

1 medium tomato, cut into large dice

1 TBSP olive oil

1/2 cup unsweetened apple juice (look for an unfiltered brand that contains nothing but pressed apples)

salt, to taste

1 tsp cornstarch

1 TBSP water

Combine chickpeas, turmeric, ginger, allspice, tomato, oil, and apple juice in a slow cooker. Cook on low for 8 hours. Salt to taste. Whisk together cornstarch and water. Increase heat to high, stir in cornstarch slurry, cover, and let sit 5 minutes. Turn off heat, uncover, and let sit another 5 minutes before serving over cooked grain (such as rice, couscous, or grits/polenta) or mashed potatoes.

2 Comments

Comment

Beyond Toast: Bread-Based Breakfast--Sweet or Savory

Hey, welcome. Consider following us on Twitter and subscribing to our RSS feed, or sign up for email updates from the Home Page.

Grab a good loaf of sourdough(*), because we've got business. Breakfast business. Perfect for a weekend morning or brunch, in just about half an hour, you can start your day with a hot, deeply satisfying meal. First up, our savory concoction that layers sourdough, simple seared tofu, beans and onions simmered with molasses (like Boston baked beans for your stovetop), plus a healthy dose of pickled jalapenos.

(*We used Flour Head Knoxville Sourdough for both dishes in this post.)

Because the beans don't get the benefit of a long cook like they normally do in the oven, we made sure to include extra flavor by beginning our beans with a generous portion of browned onions. The results are pretty great for a dish so simple and fast to put together.

Stovetop Boston Beans over Sourdough with Seared Tofu

Print the recipe

serves 2, beans adapted from The Vegan Table

For the beans:

1 15-oz can navy beans

1 medium yellow onion, finely diced

1 TBSP olive oil

1 1/2 TBSP unsulphured molasses

1 tsp turbinado or brown sugar

1/2 tsp ground mustard

1/4 tsp ground ginger

1/2 tsp liquid smoke

2 TBSP water

1/4 tsp salt

For the tofu:

7 oz extra-firm tofu, drained

1 TBSP nutritional yeast

1/4 tsp salt

1/4 tsp thyme

1/8 tsp crushed red pepper

To serve:

2 3/4-inch slices sourdough (from an 8-inch boule)

pickled jalapenos

Drain and rinse the beans in a sieve. Set aside to drain well.

Meanwhile, heat the oil in a medium pan over medium heat. Add onions, reduce heat to medium-low and cook, stirring occasionally, until browned, about 5 minutes. Add all other bean ingredients and stir. Cover, reduce heat to low, and cook undisturbed for 15 minutes. Remove cover, increase heat to medium-low, and cook 3 minutes more, or until thick but saucy.

While the beans cook, prepare the tofu. Cut a 14-oz slab of tofu (in landscape position) in half. Reserve half for another use. Turn the other half cut-side up and slice into 4 even pieces. Heat a nonstick skillet over medium-high heat. Add tofu in a single layer. Whisk together seasoning and sprinkle evenly over the top. Cook tofu 5 minutes, undisturbed. Flip and cook another 4 minutes, until golden.

To assemble, top one slice sourdough with two pieces of tofu, half the beans and onions, and top with pickled jalapenos, to taste.

Now for the sweet stuff. Not really a bread pudding, since there's no custard to bother with, and not really a brown betty, since the bread is in whole slices rather than crumbs, this doesn't really fit any definition we have handy. What it is is totally simple, absolutely gorgeous, and a dish you're positively going to want to swim in. One look at (and whiff of) this jewel-toned beauty, and we promise you'll be hooked. And it couldn't be simpler.

As if this fruity bake weren't already heaven on a spoon, it's blissfully versatile. Not only can you serve this hot, warm, cooled, or chilled, we go easy on the sugar here--just enough to make the berries sing--so feel free to dig into this as a slightly indulgent breakfast. Or brunch, of course. Use a healthy dollop of plain nondairy yogurt with a little fresh nutmeg added (we like Whole Soy Co., and their plain--but sweetened--yogurt is pictured above) to garnish the berry bake, or use the berry bake to garnish a serving of yogurt. Either way, completely stunning.

All the pictures here were taken when the bake was still hot from the oven. For neater serving and more bread-pudding-like presentation, let cool to room temperature before cutting into slices.

And, in case you needed to be told, you can take this sucker all the way into dessert territory by adding whipped coconut cream.

Berry-Sourdough Bake

Print the recipe

serves 4-6, adapted from Luscious Berry Desserts

1 lb frozen (or fresh) blueberries

12 oz frozen (or fresh) raspberries

1/4 cup maple syrup (preferably grade B)

3 1-inch-thick slices sourdough (from an 8-inch boule), halved

1 TBSP nondairy butter, such as Earth Balance, plus extra for greasing

1/2 tsp vanilla extract

plain nondairy yogurt (sweetened with maple syrup, to taste) or whipped coconut cream (sweetened with a little powdered sugar), plus freshly grated nutmeg, to serve (optional)

Heat oven to 350.

Add the berries and maple syrup to a medium sauce pan over medium heat. Bring to a boil, reduce to a steady simmer over medium-low, and let cook, stirring occasionally, until the raspberries are breaking down and the mixture thickens just a bit, about 10 minutes.

Meanwhile, butter one side of each of the six pieces of bread (you'll use 1/2 tsp per piece). Grease and flour a 6-inch cake pan. Place three pieces of buttered bread on the bottom in a single layer (smoosh them in a little, if needed), butter-side-up.

When the berries are done, remove from heat, stir in the vanilla extract, and carefully pour half the berries into the prepared pan, spreading to distribute evenly. Add the remaining three pieces of bread, butter-side-down. Pour the other half of the berries on top and spread to distribute evenly.

Bake 20 minutes. Let cool a bit before serving, but the bake can be served hot, warm, cool, or chilled. It slices fairly neatly when cool. (If using yogurt or whipped cream, sweeten to taste and stir in a generous pinch of freshly grated nutmeg before garnishing.)

Comment

2 Comments

Marinated Beans (Make Everything Better)

Hey, welcome. Consider following us on Twitter and subscribing to our RSS feed, or sign up for email updates from the Home Page.

Beans! They have fiber, protein, and variety for days. We love them. Today is all about a dead-simple method that, with a little planning to take the slow marinating into account, takes five minutes of active prep and makes beans incredibly flavorful. Really.

A little fresh herb, garlic, and olive oil makes a bowl of beans that can be savored all alone as an easy side dish (or a simple meal paired with crusty bread or cornbread), or considered prep and used as the base of a soup. Naturally, they're always welcome in a green dinner salad. Or piled on top of rice. Depending on your mood, preference, and what else you have lying around the kitchen, they're begging to be highlighted in your mains. We have two dinners for two that might give you an idea of how to begin adding marinated beans to your meals when you're in the mood for something that goes a little beyond rice and beans.

You can put them front and center:

Or include them with lots of other elements:

Exhibit A we whipped up on a day when we had some beautiful heirloom tomatoes. We knew they would make a lovely centerpiece for a meal, but they don't provide a lot of calories. Enter marinated beans. In the morning, we combined two cans of rinsed and drained butter beans with two or three tablespoons of olive oil, a small handful of basil leaves cut into chiffonade, a sprinkle of fine sea salt, and two smashed and peeled cloves of garlic.

Stirred it all together and let that sit in the fridge all day, until about an hour before dinner time, or about the time someone with a day job might get home from work. We then brought the beans out to let them come to room temperature.

When we started to feel hungry, out came a tube of store-bought polenta, half of which we cut into chunks and broiled along with the whole tomatoes, flipping the polenta to crust both sides. (To prep whole tomatoes for broiling: trim the tops, scoop out the seedy center, and rub the interior with a little salt and pepper. Done.) Plate it all up, and there's a completely gorgeous dinner that took all of 20 minutes--mostly inactive--of the evening to prepare, and all of it unbelievably easy.

Exhibit B took a little more chopping, but makes for a wonderfully colorful meal.

For this, we marinated just one can of pinto beans with two tablespoons olive oil, one large sprig of rosemary roughly torn, and a sprinkle of salt and pepper. To go along, we cooked fluffy couscous with the juice and zest of an orange while a grated beet did its own quick marinating in a bit of lemon juice and balsamic vinegar. Meanwhile, we chopped up a poblano and toasted some sunflower seeds.

Note that we went a little heavier on the oil for the pinto beans than we did for the butter beans to keep the latter from being too oily. For the couscous bowl, we relied on the extra oil in the beans along with the acid from the marinated beets to act as an informal dressing for our bowl. Cozy and satisfying.

And of course, this is a method, not a strict recipe. Use the herbs you like in the amount you like. Play with the garlic and oil. But don't hesitate to start experimenting. This easy bit of planning ahead gives all kinds of dishes a whole new life while providing a heap of solid nutrition.

Garlic-Herb Marinated Beans

Print the recipe

cooked beans (rinsed and well drained, if using canned--1 15-oz can or 1 1/2 cups cooked serves two for most applications)

fresh herb of choice, about 1-2 tsp chopped per serving

1/2-2 TBSP olive oil per serving

1 small-medium clove garlic per serving

fine sea or kosher salt

freshly cracked black pepper, optional

Combine all ingredients in a wide, shallow bowl. Cover with a clean kitchen towel and let marinate in the refrigerator for 8-24 hours before using.

Notes:

Most tender herbs such as basil, thyme, and oregano can be chopped finely and included in the final dish. Rosemary remains rather pungent and is best left in large chunks or even whole sprigs and removed before serving (chop a few small bits in the final dish, if desired).

To use in a soup, salad, or grain bowl, use the higher recommendation of olive oil--it will carry the herb and garlic flavors through to the final dish. For a side or main dish of beans, use the lighter end to avoid an oily texture.

Likewise, for use in soup or grain bowl (or for serious garlic lovers), mince the garlic before adding it to the beans to marinate. For a main dish presentation (or for the garlic avoidant), simply smash the garlic cloves to allow their flavor to permeate the dish, but discard the cloves before serving.

2 Comments

Comment

Apricot-Elderflower Cookies

Hey, welcome. Consider following us on Twitter and subscribing to our RSS feed, or sign up for email updates from the Home Page.

Fruity and floral, dense and rich with a fabulous exterior crunch, each one of these cookies packs the satisfaction of a full dessert serving.

Decidedly sweet without being sugary, and studded with plenty of chewy chunks of dried apricot, try savoring this cookie a little slowly with a cup of black coffee. Or if you'd like to go a step further, a little iced coffee liqueur in the evening.

Note that because these are so thick, they require a much longer baking time than your average cookie. They're worth the wait. And this makes a sizable batch (again, each cookie is pretty hefty), so once you've made it through, you'll have treats for days.

Apricot-Elderflower Cookies

Print the recipe

yields 16 cookies, adapted from Veganomicon

2 TBSP brown flax seeds, ground in a coffee grinder

1/3 cup almond or soy milk

2/3 cup natural cane sugar (evaporated cane juice)

1/2 cup peanut (or canola) oil

2 TBSP St. Germain elderflower liqueur

1 3/4 cups all-purpose flour

2 TBSP corn starch

2 tsp baking powder

1/2 tsp fine sea or kosher salt

6 oz dried apricots, chopped into small chunks (about 1 cup chopped)

Preheat oven to 350 and line a baking sheet with parchment.

Whisk together ground flax and almond milk for 30 seconds. It will become thick and a little fluffy. Whisk in sugar, oil, and liqueur until smooth. Sift in all other ingredients, except apricots. Stir. When almost all of the flour is incorporated, add the apricots. Knead them in by hand, working the dough as little as possible--aim for no more than a half-dozen folds.

Divide the dough into 16 balls (again, working the dough as little as possible) and transfer to the baking sheet. Use the bottom of a clean rocks glass (or what have you) to press the balls into a round cookie a little over 2 inches in diameter and a little less than 1 inch thick.

Bake 20 minutes. Increase heat to 375 and bake another 5 minutes, until the edges are golden. Let cool 5 minutes before transferring to a rack to cool completely.

Comment

Comment

Fresh Cherry Tomato Tartine (or Tart) with White Bean-Pignoli Puree

Hey, welcome. Consider following us on Twitter and subscribing to our RSS feed, or sign up for email updates from the Home Page.

This lovely tartine is one for your finest produce. The sweetest, ripest cherry tomatoes are the ones to highlight here, eaten absolutely fresh, entirely uncooked. The gentle acid in the tomatoes is countered with a decadent puree and a helping of aromatic herb. This wicked-fast lunch (or breakfast or dinner) is summer eating at its simplest and arguably most satisfying.

Tomatoes may be the star, but the other bits of this recipe are no slouch, either. Treat yourself to a quality bread (pictured here is a sourdough), and smear our buttery white bean-pine nut puree on top before sprinkling on your herb of choice (dill pictured here), and putting down those irresistible tomatoes.

While most bean purees, like hummus, can work as a spread or a dip, note that this one is thick, salty, and rich, falling firmly into the spread category. It gets depth of flavor and salt from umeboshi plums (available at Three Rivers), but if you can't get your hands on them, try using one or two teaspoons of red miso paste. Add a little extra lemon juice, as desired.

fresh cherry tomato tartine with white bean-pignoli puree.jpg

And naturally, if you have a little extra time, throwing together a quick tart dough will get you an elegant dish ready for an attractive dinner at home or a low-stress entertaining option. (The above was snapped at a tomato-loving pal's house.)

Fresh Cherry Tomato Tartine with White Bean-Pignoli Puree

Print the recipe

serves 1

2 thick slices sourdough (or other good-quality bread of choice), lightly toasted, if desired

2 generous TBSP White Bean-Pignoli Puree, recipe follows

finely chopped fresh herb, such as dill fronds or basil leaves

about 10 small-medium ripe cherry tomatoes, halved

Spread a generous tablespoon of puree on each slice of bread. Top with a sprinkle of herbs and arrange the cherry tomatoes on top.

White Bean-Pignoli Puree

yields about 3/4 cup

3/4 cup white beans (such as navy, Great Northern, or butter beans)

1/4 cup pignoli (pine nuts)

2 umeboshi plums, pitted

1 TBSP lemon juice

1 TBSP olive oil

1/4 tsp dijon mustard

Puree all ingredients until smooth with an immersion blender.

Comment

Comment

Fresh Peach Tart with Almond-Blueberry Puree (and a Dead Simple Shortbread Crust)

Hey, welcome. Consider following us on Twitter and subscribing to our RSS feed, or sign up for email updates from the Home Page.

Talk about color. This tart is completely gorgeous, suitable for even the newest of cooks, and, as a bonus, tastes pretty dreamy, too. Rich, crumbly--and a little crunchy--shortbread gets topped with a modest layer of thick almond butter and quick-simmered blueberries with a little silken tofu added just to lighten it up and smooth it out. Slice up a ripe peach, garnish with a bit of basil soaked in orange liqueur, and have you ever got a summer tart worth sharing. Skip the basil-liqueur bit, and it's absolutely kid-friendly. Note that we strongly suggest using raw almond butter here for its less aggressive, and totally lovely, flavor.

This tart is best enjoyed within a day or two, since the peaches get less fresh all the time. Store any leftovers tightly wrapped in the refrigerator, but let sit at room temperature for a bit before re-serving so the crust has time to loosen up--it gets rather rigid chilled.

One last note: calling for a half-cup of almond butter, this isn't the least expensive dessert in the world, but it helps that it uses an entirely reasonable amount of seasonal fruit while still tasting thoroughly of it. A quarter of a pint of berries and one good peach are all you need to serve up this stunner, which means you can buy small, or enjoy the extras all on their own (which tends to be our favorite way to dig into summer fruit, anyway).

Fresh Peach Tart with Almond-Blueberry Puree (and a Dead Simple Shortbread Crust)

Print the recipe

yields 1 9-inch tart, crust adapted from Martha Stewart Living

For the Dead Simple Shortbread crust:

3/4 cup all-purpose flour

1/4 cup cornmeal

2 TBSP natural cane sugar (evaporated cane juice)

1/2 tsp fine sea or kosher salt

1/4 cup melted unrefined coconut oil

For the Almond-Blueberry Puree:

1/2 cup fresh (or frozen) blueberries

1 TBSP maple syrup (preferably grade B)

1/2 cup smooth, raw, unsalted almond butter

6 oz silken tofu (half an aseptic package)

1/2 tsp vanilla extract

For the topping:

6 small basil leaves, cut into chiffonade (about 1 tsp chopped)

1/2 TBSP maple syrup (preferably grade B)

1/2 TBSP orange liqueur

1 medium, ripe peach, pitted

Begin with the crust: whisk together flour, cornmeal, salt, and sugar. Add melted coconut oil and stir until thoroughly combined and sandy. Transfer to a 9-inch round springform pan and use your hands to press the dough firmly into the bottom of the pan (don't forget the edges). Freeze 20 minutes.

Heat the oven to 375. Bake crust until just golden, 22-24 minutes. This crust burns quickly, so be prepared to watch it carefully after 20 minutes. Transfer the pan to a wire rack and let cool completely before removing the side piece from the base.

In a small bowl, combine the basil, 1/2 TBSP maple syrup, and liqueur. Cover with a clean kitchen towel and set aside.

Combine the blueberries and 1 TBSP maple syrup in a small saucepan over medium heat. Cook, stirring frequently, while the syrup simmers. After a minute or two, the syrup will turn dark from the blueberries beginning to give off liquid. When it does, reduce heat to medium-low and continue to cook, stirring very frequently, until the berries have begun to break down and the whole mixture is saucy and fragrant, 3-5 minutes.

Meanwhile, add the almond butter, tofu, and vanilla extract to a food processor. Carefully add the cooked berries and puree until very smooth, scraping the sides every 30 seconds, as needed. (This may take a minute or two total.) Transfer to a bowl, place plastic wrap over the surface, and chill until needed.

Aim to assemble the tart roughly half an hour before serving, to let the topping flavors mingle. To assemble, dollop the almond-blueberry puree all over the completely cooled crust and spread evenly with a frosting spatula. Slice the peach into scant 1/4-inch slices and arrange them around the perimeter. Drizzle the basil-liqueur-maple mixture evenly over the top of the peaches. Let sit at room temperature until ready to serve.

Comment

2 Comments

Nut-Crusted Summer Squash with Gremolata over Chive Grits

Hey, welcome. Consider following us on Twitter and subscribing to our RSS feed, or sign up for email updates from the Home Page.

Take all that summer squash all your friends (and neighbors and family and co-workers) keep trying to unload on you, cover it in a rich, irresistible blend of nuts, set it atop a mound of creamy, comforting grits, sprinkle on a bright relish, and you have one seriously sunny way to dig into summer produce.

Adding pecans to the almonds in the crust gives a gentle sweetness that pairs well with the crisp freshness of the gremolata, which itself is a nice foil to the grits. Everything about this plate is easy to love, and even with all the moving parts, it only takes 30-45 minutes to put together. Perfect for nearly any night, whether you're entertaining friends, or just yourself.

The recipe below feeds two quite generously, but you should have no problem multiplying the recipe. We were able to cook the squash on our small countertop electric grill in two batches, so if you do make a larger batch, consider using a two-burner griddle on the stove (or even baking it), flipping halfway, to keep the number of batches to a minimum.

Nut-Crusted Summer Squash with Gremolata over Chive Grits

Print the recipe

serves 2 generously

For the gremolata:

3/4 cup loosely packed flat-leaf parsley

1 medium clove fresh garlic

1 lemon

pinch salt

For the squash:

1/2 cup raw, unsalted almonds

1/2 cup raw, unsalted pecans

scant 1/2 tsp fine sea or kosher salt

1/2 cup chickpea flour

1/2 cup water

1 generous lb (9-10 oz) summer squash, cut into scant 1/2-inch planks

For the grits:

1 cup quick-cooking grits

3 cups water

2 TBSP extra virgin olive oil

2 TBSP finely chopped chives

salt and freshly cracked black pepper, to taste

Lay the parsley on a cutting board and top with a pinch of salt. Using a microplane zester, grate the garlic and then zest the lemon, letting the garlic and zest fall on top of the parsley. Mince the parsley--the garlic and zest should incorporate well while you do this. Transfer the whole mixture to a serving bowl and set aside.

Preheat an electric countertop grill (or griddle on the stove).

Use a coffee grinder to process the almonds and pecans into meal. Whisk together with 1/2 tsp salt in a pie plate. In a wide bowl, whisk together the chickpea flour and water. Dip the squash planks into the chickpea mixture, scrape off excess batter, and press both sides into the nut meal, shaking off excess. Cook until tender, but firm, and browned, 8-10 minutes in a closed electric grill. (If using the stove top, flip halfway through to brown on both sides.) Note that the chickpea mixture will thicken as it stands. If you're working in batches, add water by the TBSP to thin it out in between, as needed.

Finally, prepare the grits. Bring the water to a boil, add the grits, and reduce the heat to medium-low. Add oil, chives, and plenty of freshly cracked black pepper. Cook 5 minutes, or until tender and thickened. Salt very gently (the heavier salt in the nut crust should provide most of the salt for this dish), stir to incorporate, and remove from heat. Quickly divide the grits into two serving bowls. Top with squash and gremolata. Serve immediately.

2 Comments

Comment

Mixed Potato and Tofu Tacos with Cherry-Ginger Compote

Hey, welcome. Consider following us on Twitter and subscribing to our RSS feed, or sign up for email updates from the Home Page.

These aren't the fastest tacos in the world, but they're easy to make, totally satisfying, and would make a great addition to any brunch table. Buttery gold potatoes, sunny sweet potatoes, and chewy bites of tofu all get gently seasoned and roasted until tender, then tucked into warm corn tortillas.

The compote is a breeze to make, especially if you go with frozen cherries that have already been pitted. Just a little grating, and the stove does the work. It adds a beautiful fruity burst to these tacos or anything else you might have lying around the kitchen.

If you'd rather take these in more savory (and minimal) direction, skip the compote and grab a bottle of hot sauce. Dinner is served. Likewise, leftovers can be sauteed with a bunch of lamb's quarters (or spinach) and served with hot sauce for a killer breakfast hash fast enough for a weekday morning. Frankly, it's worth making just for that.

Mixed Potato and Tofu Tacos with Cherry-Ginger Compote

Print the recipe

yields about 1 dozen tacos

14 oz extra-firm tofu, drained

1 1/2 lbs Yukon Gold Potatoes (about 2 very large)

1 lb sweet potato (about 1 very large)

3 TBSP olive oil

1/2 tsp chipotle powder

1/4 tsp ground cumin

1/4 tsp ground coriander

1/4 tsp rubbed sage

salt and freshly cracked black pepper

1 lb pitted cherries, frozen or fresh

1/2-inch piece ginger, grated

1/4 cup unsweetened applesauce

1 tsp reduced-sodium tamari

soft corn tortillas, to serve

Turn the drained block of tofu on its long narrow side and slice it in half lengthwise. Place the rectangles side-by-side, wrapped in two layers of clean kitchen towel (not terry cloth), and place a dutch oven or other heavy, stable object (that can get a bit wet) on top. Set aside.

Heat oven to 400.

Meanwhile, chop both types of potato into 3/4-inch dice, then remove tofu and dice. Place potatoes, oil, chipotle powder, cumin, coriander, sage, salt (about 1/2 tsp, or to taste), and pepper to a roasting pan and toss thoroughly with your hands. Add tofu and toss gently with your hands to incorporate and coat well. Roast, tossing every 20 minutes, until tender and just beginning to brown, 70-80 minutes.

While the potatoes roast, combine the cherries, ginger, applesauce, and tamari in a small pot over medium heat. When it boils, reduce the heat a bit and let bubble until the cherries have broken down and the mixture is thickened, but still a bit saucy, about 15 minutes. Set aside.

Heat a nonstick skillet over medium heat and warm tortillas for 1 minute on each side. Serve immediately.

Comment

4 Comments

Ginger Sherbet Floats Two Ways: Utterly Breezy or Bold and Boozy

Hey, welcome. Consider following us on Twitter and subscribing to our RSS feed, or sign up for email updates from the Home Page.

Even though there's no ice cream maker in the MSV kitchen, there is a food processor. And given that, it's not tough to whip up some tasty frozen stuff, and the imperfections in texture literally melt away once you dunk a scoop of frosty, spicy-sweet, completely irresistible ginger sherbet into a glass of something fizzy and refreshing.

If you do have an ice cream maker, by all means, use it. If not, just blend, freeze in chunks using an ice cube tray, and blend it all again when ready to serve. Easy. And so, so good.

Vegan Ginger Sherbet

Print the recipes

serves 6-8

2 cups coconut milk

1 3x1-inch piece peeled fresh ginger

6 TBSP natural cane sugar (evaporated cane juice)

1 tsp vanilla extract

Place all ingredients in a quart jar and blend with an immersion blender until the sugar is completely dissolved and the mixture is very smooth, about a minute. Strain to remove the ginger hairs, pour into an ice cube tray (you'll have slightly more than one standard plastic tray will hold), and freeze.

When ready to serve, slide a thin, dull knife or spatula along the side of each cube and gently pry out--this should happen fairly readily. Add 2-3 sherbet cubes per person to a food processor and process until creamy. It will be a bit sandy and icy at first, but after half a minute or so, the whole mixture will pull away from the processor tub and cohere into a creamy, semi-firm, consistency that can be scooped easily.

Now to put that sherbet to work. But even if you have no interest in floats, pay attention, because this watermelon-basil syrup is hard to resist. It makes an addictive soda that's fruity, herbal, and unbelievably light without tasting thin. One sip leaves you wanting another. And that might go double once the ginger sherbet gets things all creamy and gently spicy.

Equal parts syrup and club soda make a delicate drink that can be enjoyed all alone over ice or spiked--go simple with vodka or go for a low-key, totally affable warm-weather whiskey drink: 2 oz Watermelon-Basil Syrup, 2 oz club soda, 1 oz rye (we used Bulleit), and 1/2 oz orange liqueur. Serve over ice, finish with a squeeze of lime.

Breezy Watermelon-Basil Soda

equal parts Watermelon-Basil Syrup, recipe follows, and club soda

Watermelon-Basil Syrup

yields 1 2/3-1 3/4 cups

1 lb watermelon (2 1/2-3 cups 1-inch cubes)

1 dozen medium-large basil leaves (about 5 grams, or 1/4 cup loosely packed leaves)

1 lime, sliced, ends discarded

1/4 cup natural cane sugar (evaporated cane juice)

1/4 cup water

Add the watermelon and basil to a pitcher and blend with an immersion blender. Add lime slices.

In a small sauce pan over medium heat, heat the sugar and water. When it comes to a boil, reduce heat to low and stir constantly until the sugar dissolves. Remove from heat immediately, let cool a minute, then carefully add to the blended watermelon. Cover with a clean kitchen towel and let sit for 1 hour. Strain (you won't press on the solids, exactly, but stir the whole thing to help it along) and discard solids. Chill until ready to use. Stir well before each use.

And now for something simpler. This is actually what got this post started. Ginger sherbet was made, and Ginger Sherbet Framboise Floats were had. And had and had.

Ginger Sherbet Framboise Floats

Print the recipes

serves 2

1 12-oz bottle Lindemans Framboise Lambic

ginger sherbet (see recipe above--use 5 frozen sherbet cubes)

Pour 6 ounces beer over 1 scoop of ice cream and serve.


4 Comments

Comment

Dead Simple Spreads: Cinnamon-Raisin Whipped Peanut Butter and Garden Tofu Spread

Hey, welcome. Consider following us on Twitter and subscribing to our RSS feed, or sign up for email updates from the Home Page.

Some weeks, we have no problem improvising, but others, the luxury of having a fridge stocked with convenience is a must. Enter these spreads. First up, this little whipped peanut butter number. It's mild, cool, creamy, studded with raisins, and begs to be sandwiched in a bagel. What's not to love?

Note that the peanut butter flavor gets toned down considerably in this condiment while still giving great texture. So even if you've never been a big fan of slathering straight peanut butter on a bagel or toast, you may want to give this one a try.

Cinnamon-Raisin Whipped Peanut Butter Spread

Print the recipes

yields a generous 1/2 cup

1/2 cup smooth peanut butter (look for one that contains nothing but peanuts)

1/4 cup unsweetened applesauce

1 TBSP coffee liqueur

1/2 tsp ground cinnamon

1/8 tsp ground cardamom

1-2 TBSP raisins, to taste

Add all ingredients except raisins to a food processor. Process, scraping as needed, until the mixture pulls away from the bottom and sides and coheres into a shaggy ball. Add raisins, pulse to incorporate, and chill until ready to use.

Next up: this has been our absolute favorite dinner lately: elegant looking, but hearty, and nothing could be simpler. We put together this spread using fresh fruit, greens dressed in our favorite hummus, store-bought multi-grain crackers, and this Garden Tofu Spread. This one owes an enormous debt to Isa Chandra Moskowitz's herb spread in Vegan Brunch. Our version tweaks her ratios a bit, trades her fresh herbs for finely chopped veg, and takes the cost down another healthy notch by using pepitas instead of cashews. (Her herb version is less expensive if you have a large herb garden, but if you're relying on a supermarket, it gets pretty frisky with your wallet.) The result is versatile and crazy-handy. And naturally, you can sandwich it in a bagel, too. Or toss it with pasta salad. Or most anything, really.

One note: the spread must sit in the refrigerator for a few hours before eating to let the flavors, and even texture, come together. If you taste it immediately after processing, you'll find the pepitas are too assertive, and everything else seems bland. But a few hours later, the seeds soften, the whole thing gets creamier, and the garden bit really begins to come through. This remains a mild spread--hence the versatility--but letting it rest before serving really makes a difference.

Garden Tofu Spread

Print the recipes

yields about 1 pound, adapted from Vegan Brunch

1/2 cup raw, unsalted, hulled pepitas

1 large carrot (about 2 oz total weight), peeled, trimmed, and roughly chopped

1 very small poblano pepper, or half a large (about 2.5 oz total weight), trimmed, seeded, and roughly chopped

2 scallions, white and tender green parts, thinly sliced

14 oz extra-firm tofu, drained

2 TBSP nutritional yeast

2 TBSP lemon juice

1 tsp dried oregano

1/2 tsp celery seed

1/2 tsp garlic powder

1/4 tsp fine sea or kosher salt

freshly cracked black pepper, to taste

Add the pepitas to a food processor and process into small crumbs. Transfer to a bowl and set aside.

Add the carrot and poblano to the processor and process until very finely chopped. Add all other ingredients, including pepita crumbs, and process for about a minute, until smooth, scraping the bowl as needed. Transfer to an airtight container and refrigerate for at least a few hours before serving.

Comment

Comment

Party Animals No. 31: Strawberry Pasta Salad for Dinner at a Pal's

Hey, welcome. Consider following us on Twitter and subscribing to our RSS feed, or sign up for email updates from the Home Page.

No need to wait for tomatoes to peak when you have a fresh, tasty pasta salad that takes advantage of spring's strawberries. Perfect for any potluck, outdoor entertaining, or an easy weeknight meal, we couldn't be happier about this salad. Fresh cucumbers, gently nutty seared zucchini, a bit of basil, and a balsamic vinaigrette are all you need, but for a one-dish meal with higher protein, cooked chickpeas, edamame, or what have you will likely feel right at home in this bowl.

Fresh is best with this one, so aim to assemble the salad only an hour or so before you want to serve it. That said, leftovers can be kept for a day or two, but the strawberries will begin to break down the longer it sits. You should have no problem cutting the recipe in half if you're afraid you won't get through a full pound of pasta before the strawberries give up the ghost. (Do note that a thorough toss with your favorite creamed herb tofu spread gives leftovers a whole new life.)

And, of course, feel free to keep this recipe on hand well into the summer, because substituting tomatoes for the strawberries once they do peak doesn't sound like a bad idea at all.

Strawberry Pasta Salad

Print the recipe

serves 8-12 (low end as a main, high end as a side)

1 medium zucchini (about 8 oz), sliced into 6 long planks

1 medium cucumber (about 10 oz)

1 lb strawberries

8 medium basil leaves (substitute half lime basil, if available)

1 lb small dried pasta of choice

salt

1/4 cup extra virgin olive oil

2 TBSP balsamic vinegar, the best you can afford [see Note]

1/2 tsp dried oregano

1/2 tsp fine sea or kosher salt

freshly cracked black pepper, to taste

Heat a countertop electric grill or ridged griddle. Cook the zucchini until striped and tender, but still firm, just a few minutes, checking occasionally to avoid overcooking. Remove from heat and set aside.

Meanwhile, seed the cucumber and slice it thinly into a serving bowl. Trim the strawberries and slice them thickly, 3-4 slices per berry for medium-large berries. Add them to the cucumbers. Slice the basil into very thin ribbons and add the chiffonade to the serving bowl. When the zucchini is cool, slice each plank lengthwise into thirds, then into 1-inch strips. Add to the serving bowl.

Heat a pot of water with a generous sprinkle of salt, and cook the pasta according to the package directions. While it cooks, whisk together the oil, vinegar, and 1/2 tsp salt.

When the pasta is ready, drain thoroughly, allow to cool for just a minute, and add to the serving bowl. Pour the dressing over, toss thoroughly to combine, and add freshly cracked black pepper and additional salt, to taste. Serve at room temperature or chilled.

[Note: if you want to use a balsamic vinegar you're not confident about, pour a little more than called for into a small saucepan and simmer until it reduces a bit and gets a little syrupy. You're now sitting pretty.]

Comment

Comment

Spiced Bean, Rice, and Veg Bowl with (Optional) Red Pepper-Chipotle Sauce

Hey, welcome. Consider following us on Twitter and subscribing to our RSS feed, or sign up for email updates from the Home Page.

Dishes like this one make it clear why rice and beans make for such a reliably satisfying meal. Earthy and hearty and comforting, we're always up for any variation, and this one is seductively fragrant.

Naturally, pretty much any vegetable with a firmer texture will work well here, and likewise, you can substitute a different bean, if you prefer. But we recommend sticking with the darker, less subtle types to stand up to the mix of chipotle, cinnamon, cayenne, and cloves.

The roasted red pepper-chipotle sauce is simple and tasty, but completely optional. If you don't feel like fooling with the extra step, no problem. Simply mince two chipotles en adobo (seeded or not, depending on your preference) and saute them along with the garlic. That gets you a fully spiced and spicy bowl without the extra appliance to wash. So much so that the recipe below is for the naked bowl, with the sauce as an optional variation.

Spiced Bean, Rice, and Veg Bowl

Print the recipe

serves 6

8 oz dried adzuki beans (or substitute black, kidney, or pinto beans), soaked 8 hours

1/2 tsp liquid smoke

1/2 tsp onion powder

1/4 tsp garlic powder

1/2 tsp fine sea or kosher salt

2 TBSP extra virgin olive oil

large handful green beans, trimmed

4 large cloves garlic, minced

2 chipotles en adobo (seeded if desired), minced

1 1/2 cups medium-grain brown rice

2 cups water

1/2 tsp ground cinnamon

1/4 tsp ground cayenne

1/8 tsp ground cloves

small handful flat-leaf parsley, chopped

salt and black pepper, to taste

Red Pepper-Chipotle Sauce, to serve, optional, recipe follows (if using, omit chipotles above)

Combine the soaked beans, liquid smoke, onion powder, and garlic powder in a large pot and add water to cover by two inches. Bring to a boil, reduce to a simmer, and cook with the lid cocked until the beans are tender, about 45 minutes. When tender, add 1/2 tsp salt and stir to combine. Pour off excess liquid, if needed. Set aside. (The beans can be prepared up to a few days in advance, but store them, refrigerated, in their cooking liquid.)

Heat oil in a dutch oven over medium heat. Add green beans and saute until crisp-tender, 3-5 minutes. Remove the beans with a slotted spoon, leaving the oil in the pot, and set aside.

Reduce heat to medium-low, add garlic and chipotles, and cook until fragrant, a couple of minutes, being careful not to burn the garlic. Add rice, stir until shiny and fragrant, and add water, cinnamon, cayenne, and cloves. Bring to boil, cover, reduce heat to low, and cook undisturbed for 30 minutes. The rice should be tender and no water should remain. Stir in the parsley, both cooked beans, and season to taste.

If using the red pepper-chipotle sauce, serve on the side at the table.

Red Pepper-Chipotle Sauce

2 large roasted red peppers

2 TBSP lemon juice

2 chipotles en adobo (seeded, if desired)

1/4 cup tahini

1/4 tsp fine sea or kosher salt

Blend all ingredients until smooth.

Comment

Comment

Party Animals No. 30: Mother's Day Brunch for Two

Hey, welcome. Consider following us on Twitter and subscribing to our RSS feed, or sign up for email updates from the Home Page.

Not only did we love celebrating Mother's Day with this wildly colorful, fresh, and flavorful intimate brunch, it was some of the easiest entertaining we've ever arranged, leaving most of our attention devoted to our guest. We whipped up ice cream and cheesecake the day before and sailed into brunch with little more than some chopping and a bit of searing required.

To start, a sparkling wine cocktail. We don't have an ice cream maker, so super-creamy homemade ice creams just can't happen. But since the purity of texture doesn't matter as much when you're making a float, we're getting into it in a pretty serious way as the weather heats up (stay tuned for another float coming in the near future). To make this drink, drop a large melon baller's worth of strawberry ice cream into a flute, pour over half an ounce of orange liqueur, top with bubbly of choice, and finish with a squeeze of fresh lemon or lime juice.

Next up, food. The salad, we winged, but it's one large peeled cucumber, seeded and diced, tossed with a small handful of chopped cilantro and, say, a couple of cups of chopped fresh pineapple. Add half a minced jalapeno, a generous pinch of salt, and lime juice to taste, a tablespoon or so. Let sit for a few minutes to let the flavors mingle before serving.

For the main event, we went with a stack, something in the neighborhood of a Tofu Benedict. Split an English muffin and toast the cut sides. Then follow our instructions here for the tofu and green beans, using only seven ounces tofu (cut into four slices--half the recipe over there) and substituting one dozen trimmed green beans for the asparagus in that post. And be sure to add a generous sprinkle of black pepper to the tofu along with the other seasonings.

To serve, top each muffin half with half a dozen green beans, two slices of tofu, and smother each in this pretty wonderful roasted red pepper-avocado sauce. This makes more sauce than needed for the brunch for two, but you'll be thrilled to have the leftovers.

Dead Simple Roasted Red Pepper-Avocado Sauce

Print the recipe

flesh of 1 ripe avocado

2 large roasted red peppers (jarred or freshly roasted)

1/2 tsp garlic powder

1/4 tsp dried dill

1 TBSP lemon juice

1 tsp dijon mustard

dash hot sauce

Blend all ingredients until very smooth. Adjust seasoning, if necessary.

We wrapped the meal with the Lemon Cheesecake recipe from The Joy of Vegan Baking, which has never failed to please any of our crowds. We whipped up a simple ginger snap cookie crust for the base and for a topping, sliced strawberries lightly marinated in equal parts orange liqueur and black walnut balsamic vinegar.

Comment

Comment

Tempeh-Broccoli Salad Pita with Stone-Ground Mustard, Walnuts, and Cornichons

Hey, welcome. Consider following us on Twitter and subscribing to our RSS feed, or sign up for email updates from the Home Page.

First off, this one's for the deli crowd. The lovers of dark mustard and pickles. This pita, stuffed with spicy stone-ground mustard, mellow cornichons, crunchy walnuts, and lightly nutty tempeh all mixed together with bits of broccoli,  makes for a fully satisfying sandwich with great texture.

And while it's common to mean heavy potatoes and pasta when we say "comfort food," there's another, subtler, workaday sort of comfort food that is no less powerful (more, possibly) for being a staple dish you turn to day after day for simple, but serious, pleasure. That's this pita.

Tempeh-Broccoli Salad Pita with Stone-Ground Mustard, Walnuts, and Cornichons

Print the recipe

serves 4

1 medium crown (about 10 oz) broccoli, torn into large florets, tough stems discarded

8 oz tempeh

3/4 cup raw, unsalted walnuts

1 dozen cornichons

1/4 cup stone-ground mustard

1/4 cup extra virgin olive oil

black pepper, to taste

2 loaves pita, cut in half

lettuce (any tender variety)

Steam the broccoli and tempeh, uncovered, for 10 minutes.

Meanwhile, chop the walnuts and cornichons. Stir together mustard, oil, and pepper in a mixing bowl.

When the tempeh and broccoli are done, carefully remove the tempeh from the steamer and set aside. Add the broccoli to a food processor and carefully pulse (watch for steam) until well chopped. Add tempeh and pulse until crumbled, but chunky.

Add walnuts, cornichons, broccoli, and tempeh to the mixing bowl and combine thoroughly. Adjust seasoning, if necessary. Tuck a couple of lettuce leaves along the bottom of a pita half, spoon salad generously on top, and serve.

Comment

Comment

Lemon-Pepper Chickpea-Artichoke Salad Sandwich

Hey, welcome. Consider following us on Twitter and subscribing to our RSS feed, or sign up for email updates from the Home Page.

Lemon and pepper and artichoke hearts, oh my. Add chickpeas, parsley, and chives, and get to munching. This light, lemony, downright breezy sandwich is elegant enough for early-day entertaining, easy enough to to make for packed lunches, and good enough to eat almost everyday. Top your sandwich with baby arugula for a nice garnish.

To make this truly a snap to put together, we use canned artichoke hearts, and to save money, we cooked our chickpeas from dried beans the day before, while we were making a different meal. To keep them firmly all-purpose, we didn't season the chickpeas at all after cooking. If you opt to use canned beans, you may need less salt than called for in the recipe.

Lemon-Pepper Chickpea-Artichoke Salad Sandwich

Print the recipe

makes enough for about 6 sandwiches

1 14-oz can quartered artichoke hearts, drained and rinsed well

3 cups cooked chickpeas (or 2 cans, drained, but not rinsed)

1/2 cup loosely packed (about 1 medium bunch) flat-leaf parsley, roughly chopped

1/2 oz (a good handful) chives, finely chopped/snipped

1/4 cup extra-virgin olive oil

2-3 tsp cracked black pepper, to taste

juice and zest of 2 lemons

1/2 tsp fine sea or kosher salt, or to taste

whole wheat or multigrain bread, for serving

baby arugula, for serving (optional)

Add the artichoke hearts to a food processor and pulse until finely chopped. Add chickpeas and parsley and pulse until chickpeas are well chopped, but still a bit chunky. In a medium bowl, stir together all other salad ingredients, add the chickpea-artichoke mix, adjust seasoning if necessary, and serve at room temperature on hearty bread.

Comment